Getting Started
We are grateful for your interest in contributing to Rspack! Every single contribution counts and helps us take Rspack to the next level.
Asking Questions
If you have any questions, please do not hesitate to ask in either the Discord support channel or on the Github discussion board.
What should I work on?
Good First Issue
If you are looking to dive into the codebase and get started, we recommend checking out our issue list labeled with good first issue. This will help you get acquainted with the project and start contributing.
Tracking Issue
If you are interested in understanding our project's direction and want to work on issues that are aligned with our priorities, our tracking issues list provides an overview of our progress and current goals.
Other ways to contribute
We are always looking for contributors, and that goes beyond just our main repository. Check out these other ways to get involved and start making a difference today.
- The documentation website is at web-infra-dev/rspack-website
- This dev guide is at web-infra-dev/rspack-dev-guide
- Community packages is at https://github.com/rspack-contrib
As a reminder, all contributors are expected to follow our Code of Conduct.
About this guide
This guide is meant to help document how Rspack works, as well as to help new contributors get involved in Rspack development.
How to build and run the compiler
Please see prerequisites for setting up Rust and Node.js.
Install Node.js dependencies
Install Node.js dependencies via pnpm.
# enable pnpm with corepack, only available on node >= `v14.19.0`
corepack enable

# or install pnpm directly
npm install -g pnpm@8

# Install dependencies
pnpm install
Building Rspack
- Run
cargo buildto compile Rust code. - Run
pnpm run build:cli:debugto compile both Node.js and Rust code.
The built binary is located at packages/rspack-cli/bin/rspack.
Prerequisites
Setup Rust
- Install Rust using rustup.
- If you are using VSCode, we recommend installing the rust-analyzer extension.
Setup Node.js
Install Node.js
We recommend using the LTS version of Node.js 16. You can check your currently used Node.js version with the following command:
node -v
#v16.18.0
If you do not have Node.js installed in your current environment, you can use nvm or fnm to install it.
Here is an example of how to install the Node.js 16 LTS version via nvm:
# Install the LTS version of Node.js 16
nvm install 16 --lts

# Make the newly installed Node.js 16 as the default version
nvm alias default 16

# Switch to the newly installed Node.js 16
nvm use 16
Suggested Workflows
Testing
We currently have two sets of test suites, one for Rust and one for Node.js.
Rust Testing
cargo testwill run all the rust side tests, which includes standalone tests for core functionality and plugins.UPDATE=1 cargo testwill automatically update the failed snapshot
Node Testing
We are maintaining two test suites for Node Testing in Rspack, Rspack Testing and Webpack Testing
Webpack Testing
We copy the whole webpack test suites into webpack-test folder to check the compatibility with webpack. If you add features or fix bugs we recommend you check whether this feature or bug is covered in webpack test suites first. If it's covered and testable in Webpack Testing, you can enable specific test case by setting return value to true in test.filter.js in this case folder to enable this case. See more details in https://github.com/web-infra-dev/rspack/blob/main/webpack-test/README.md, Please note that don't modify original test code in Webpack Testing, if you find difficulties in running test suites without modifying original code, you can copy this test code in the following [Rspack Testing](#Rspack Testing).
Run Tests
# In root path
./x build -a # build binding and js part
./x test webpack # run webpack test suites
Rspack Testing
We maintain test suites in Rspack Testing which is not coverable or need to be modified in Webpack Testing. The test suites lies in rspack-test. This folder structure is similar with Webpack Testing.
Run Tests
# In root path
./x build -a
./x test js
Or only test the package that you made the changes:
# In the Node.js package path
pnpm run build && pnpm run test
To update snapshots:
pnpm --filter '@rspack/*' test -- -u
Node Testing Suite Overview
We use jest for Node.js tests, The most important test cases are the case in the packages/rspack. most of these cases comes from webpack https://github.com/webpack/webpack/tree/main/test because we want to make sure that Rspack can work as same as webpack.
There are three kinds of integration cases in @rspack/core.
case.test.ts
Cases are used to test normal build behavior, we use these cases to test against bundler core functionality, like entry, output, module resolve, etc. it will first build your test file to test whether the input could be compiled successfully, then it will use the bundled test file to run test cases in the test file to test bundler's all kinds of behavior.
configCase.test.ts
Cases are used to test custom build behavior, you could use custom webpack.config.js to override default build behavior, you can use these cases to test against behavior related to specific config.
statsTestCase.test.ts
Cases are used to test your stats, By Default we will use jest's snapshot to snapshot your stats, and we highly recommend to avoid snapshot except statsCase. you can use statsCase to test behaviors like code splitting | bundle splitting, which is hard to test by just running code.
E2E
The packages/playground provides e2e testing feature. We use playwright as the e2e testing framework.
Cases
The entry point of a test case is a file ending with .test.ts, and the parent directory of this file is the project directory.
Here are some rules about test cases:
- The project directory must contain
rspack.config.jsto start the dev server. - The project directory can contain multi
*.test.ts. - All test cases share dependencies, so just add dependencies in
packages/playground/package.json. - The cases folder should contain the category folders and then is the project folders. In principle, there should be no third-level directory.
Fixtures
The fixtures is a feature of playwright, in short it provides a variable that is generated in before{Each|All} and destroyed in after{Each|All}. More information see test-fixtures
Here are some rules when defining a new fixture:
- Private fixtures should start with
_and are used only in the current file. - A file only provides fixtures with the same name.
- A file can only provide one option and starts with
default - Register fixtures in
fixtures/index.tsand export only necessary variables and types.
Here are some existing fixtures:
pathInfo
This fixture will generate test environment, and calculate the PathInfo.
type PathInfo = {
    // test file path
    testFile: string;
    // project dir
    testProjectDir: string
    // temporary project directory to be copied into
    tempProjectDir: string
}
rspack
This fixture will start the rspack dev server and provide some useful methods.
type Rspack = {
    // rspack running project directory
    projectDir: string
    // rspack compiler
    compiler: Compiler
    // rspack dev server
    devServer: DevServer
    // waiting for rspack build finish
    waitingForBuild: () => Promise<void>
    // waiting for hmr finish, the poll function is used to check
    waitingForHmr: (poll: () => Promise<boolean>) => Promise<void>
}
fileAction
This fixture will provide file change operations.
type fileAction = {
    updateFile(relativePath: string, fn: (content: string) => string): void
    deleteFile(relativePath: string): void
}
How it works
- playwright scan all test case and allocates a worker to run each case.
pathInfocopy the project directory corresponding to the current case totemp/${worker_index}.rspackrewrite dev server port to8000 + worker_indexand start compiler and dev server intemp/${worker_index}.- run current tests.
rspackclose dev server and compiler.pathInfocleartemp/${worker_index}
Debugging
Debugging with VSCode
- Install
go install github.com/go-delve/delve/cmd/dlv@latest - Install VSCode extension rust-analyzer and CodeLLDB
- build
@rspack/cliand napi binding by runpnpm install && pnpm -w build:cli:debug - In VSCode's
Run and Debugtab, selectdebug-rspackto start debugging the initial launch of@rspack/cli. This task can be configured in.vscode/launch.json, which launches the Node and Rust debugger together.
Tracing
tracing is used to instrumenting Rspack.
The supported tracing levels for
- release builds are
INFO,WARNandERROR - debug builds are
TRACE,DEBUG,INFO,WARNandERROR
Use the RSPACK_PROFILE environment variable for displaying trace information
RSPACK_PROFILE=TRACE=layer=logger rspack build
# filter for an event
RSPACK_PROFILE='TRACE=layer=logger&filter=rspack_core::compiler::compilation' rspack build
# with logger level
RSPACK_PROFILE='TRACE=layer=logger&filter=rspack_core::compiler::compilation=info' rspack build
# filter logs across multiple modules
RSPACK_PROFILE='TRACE=layer=logger&filter=rspack_core::compiler::compilation,rspack_core::build_chunk_graph::code_splitter' rspack build
# [fn_name] will show:
# - all functions calls to `fn_name`
# - the arguments(except for these in the `skip` list)
# - everything until this function returns
RSPACK_PROFILE='TRACE=layer=logger&filter=[build_chunk_graph]' rspack build
# compilation::chunk_asset is a custom instrument name
RSPACK_PROFILE='TRACE=layer=logger&filter=[compilation:chunk_asset]' rspack build
# log a specific function by their arguments
RSPACK_PROFILE='TRACE=layer=logger&filter=[compilation:chunk_asset{filename="main\.js"}]' rspack build
# It support regexp expression
RSPACK_PROFILE='TRACE=layer=logger&filter=[compilation:chunk_asset{filename=".*\.js"}]' rspack build
# disable ansi color escape codes
NO_COLOR=1 RSPACK_PROFILE=TRACE=layer=logger rspack build
oxc_resolver
oxc_resolver emits some tracing information for debugging purposes.
RSPACK_PROFILE='TRACE=filter=oxc_resolver=trace&layer=logger' rspack build
rust-lldb
rust-lldb can be used to get panic information from debug builds
rust-lldb -- node /path/to/rspack build
Once it launches, press r for running the program.
For example, examples/arco-pro crashes without any information before this fix:
rspack/examples/arco-pro ❯ node ../../packages/rspack-cli/bin/rspack build
Rspack ██████████████████████░░░░░░░░░░░░░░░░░░ 56% building ./pages/welcome
zsh: bus error  node ../../packages/rspack-cli/bin/rspack build
Using rust-lldb
rspack/examples/arco-pro ❯ rust-lldb -- node ../../packages/rspack-cli/bin/rspack build
Press r and it prints:
Process 23110 stopped
* thread #10, name = 'tokio-runtime-worker', stop reason = EXC_BAD_ACCESS (code=2, address=0x70000cc66560)
    frame #0: 0x0000000140d0db4b rspack.darwin-x64.node`swc_ecma_parser::parser::expr::ops::_$LT$impl$u20$swc_ecma_parser..parser..Parser$LT$I$GT$$GT$::parse_unary_expr::h29f49330a806839c(self=0x0000000000000000) at ops.rs:244
   241 	    /// Parse unary expression and update expression.
   242 	    ///
   243 	    /// spec: 'UnaryExpression'
-> 244 	    pub(in crate::parser) fn parse_unary_expr(&mut self) -> PResult<Box<Expr>> {
   245 	        trace_cur!(self, parse_unary_expr);
   246 	        let start = cur_pos!(self);
   247
Target 0: (node) stopped.
Mixed Debugging Between JavaScript and Rust
This discussion aims to illustrate the method for mixed debugging between JavaScript and Rust.
Prerequisites
To illustrate this process, I'll use an example. Let's start by introduce the environment and example I have used.
- System: macos
- IDE: vscode
- Debugging target:
rspack build ${projectRoot}/basic
Firstly, you need to build rspack in debug mode. To do this, execute the following commands in the project's root directory:
npm run build:binding:debug
npm run build:js
Configure launch.json in vscode
It's necessary to configure two debug configurations within in .vscode/launch.json.
- attach for node:
{
  "name": "attach:node”,
  "request": "attach",  // refer: https://code.visualstudio.com/docs/editor/debugging#_launch-versus-attach-configurations
  "type": "node",
  // `9229` is the default port of message
  "port": 9229
}
- and launch for lldb
{
  "name": "launch:rust-from-node",
  "request": "launch”,
  "type": "lldb",    // it means we use `lldb` to launch the binary file of `node`
  "program": "node”,
  "args": [
    "--inspect",
    "--enable-source-maps",
    "${workspaceFolder}/packages/rspack-cli/bin/rspack",
    "build",
    "-c",
    "${workspaceFolder}/examples/basic/rspack.config.js",
  ],
   // `cwd` is just for repack find the correctly entry.
  "cwd": "${workspaceFolder}/examples/basic/"
}
Next, we can utilize compounds to amalgamate the two commands:
{
  "name": "mix-debug",
  "configurations": [
    "attach:node",
    "launch:rust-from-node"
  ]
}
Finally, your launch.json should appear as follows:
{
  "configurations": [
    {
      "name": "attach:node",
      "request": "attach",
      "type": "node",
      "port": 9229
    },
    {
      "name": "launch:rust-from-node",
      "request": "launch",
      "type": "lldb",
      "program": "node",
      "args": [
        "--inspect",
        "--enable-source-maps",
        "${workspaceFolder}/packages/rspack-cli/bin/rspack",
        "build",
        "-c",
        "${workspaceFolder}/examples/basic/rspack.config.js",
      ],
      "cwd": "${workspaceFolder}/examples/basic/"
    }
  ],
  "compounds": [
    {
      "name": "mix-debug",
      "configurations": [
        "attach:node",
        "launch:rust-from-node"
      ]
    }
  ]
}
Debugging Attempt
Next, we can introduce some breakpoints and commence debugging.
The result appears as follows:
Profiling
In this section, we'll explore how to profile Rspack for identifying bottlenecks. By examining where Rspack spends its time, we can gain insights into how to improve performance. Since different profilers have different strengths. It is good to use more than one.
Tracing
tracing is used to instrumenting Rspack.
The supported tracing levels for
- release builds are
INFO,WARNandERROR - debug builds are
TRACE,DEBUG,INFO,WARNandERROR
Two ways to enable tracing:
- if you are using
@rspack/cli, you can enable it byRSPACK_PROFILEenvironment variable. - if you are using
@rspack/corewithout@rspack/cli, you can enable it byexperimental_registerGlobalTraceandexperimental_cleanupGlobalTrace, checkout how we implementRSPACK_PROFILEin@rspack/cliwith these two function for more details.
Chrome
tracing-chrome is supported for viewing tracing information graphically.
Setting the environment variable RSPACK_PROFILE=TRACE=layer=chrome before running Rspack, for example
RSPACK_PROFILE=TRACE=layer=chrome rspack build
produces a trace file (.rspack-profile-${timestamp}/trace.json) in the current working directory.
The JSON trace file can be viewed in either chrome://tracing or ui.perfetto.dev.
Terminal
Granular tracing event values can be viewed inside the terminal via RSPACK_PROFILE=TRACE=layer=logger, for example
RSPACK_PROFILE=TRACE=layer=logger rspack build
will print the options passed to Rspack as well as each individual tracing event.
Nodejs Profiling
If we find that the performance bottleneck is on the JS side (e.g. js loader), then we need to further analyse the js side, and we can use Nodejs Profiling to analyse. for example
node --cpu-prof {rspack_bin_path} -c rspack.config.js
or
RSPACK_PROFILE=JSCPU rspack build
this will generates a cpu profile like CPU.20230522.154658.14577.0.001.cpuprofile, and we can use speedscope to visualize the profile, for example
npm install -g speedscope
speedscope CPU.20230522.154658.14577.0.001.cpuprofile
Mac Xcode Instruments
Xcode instruments can be used to produce a CPU profile if you are on a Mac.
To install Xcode Instruments, simply install the Command Line Tools:
xcode-select --install
For normal Rust builds, cargo instruments can be used as the glue
for profiling and creating the trace file.
Since Rspack takes quite a while to build, you can use the following procedure without invoking cargo instruments.
It has the same effect.
In workspace root's Cargo.toml, turn on debug symbols and disable symbol stripping in the [profile.release] section
[profile.release]
debug = 1 # debug info with line tables only
strip = false # do not strip symbols
Then build the project
pnpm run build:cli:release
The final binary is located at packages/rspack-cli/bin/rspack once the project is built.
Under the hood, cargo instruments invokes the xcrun command,
which means we can run the following in our own project that uses Rspack.
xcrun xctrace record --template 'Time Profile' --output . --launch -- /path/to/rspack/packages/rspack-cli/bin/rspack build
It produces the following output
Starting recording with the Time Profiler template. Launching process: rspack.
Ctrl-C to stop the recording
Target app exited, ending recording...
Recording completed. Saving output file...
Output file saved as: Launch_rspack_2023-04-24_11.32.06_9CFE3A63.trace
We can open the trace file by
open Launch_rspack_2023-04-24_11.32.06_9CFE3A63.trace
Releasing
All releases are automated through GitHub actions.
All published releases of @rspack/cli can be found on the npm versions page. They are tagged as
latestwith semver versionx.y.znightlycanary
Latest Full Release
The full release workflow is currently triggered manually every Tuesday with full release notes.
The following 9 targets are built
- x86_64-unknown-linux-gnu
- aarch64-unknown-linux-gnu
- x86_64-unknown-linux-musl
- aarch64-unknown-linux-musl
- i686-pc-windows-msvc
- x86_64-pc-windows-msvc
- aarch64-pc-windows-msvc
- x86_64-apple-darwin
- aarch64-apple-darwin
Nightly
The nightly release workflow is triggered every day at UTC 16:00:07, which is 00:07 AM Beijing Time (offset with an odd minute to avoid cron jobs firing off at the same time).
The nightly build fully replicates the full release build for catching errors early.
Canary
Commenting on a PR with the text !canary triggers the canary release workflow.
Only contributors have the permission to publish canary releases.
The canary release only builds three targets for quicker feedback
- aarch64-apple-darwin
- x86_64-apple-darwin
- x86_64-unknown-linux-gnu
Intro
Thank you for your interest in contributing to Rspack! There are many ways to contribute, and we appreciate all of them.
Sending a Pull Request
- Fork the Rspack repository into your own GitHub account.
- Clone the repository to your local.
- Checkout a new branch from
main. - Set up the development environment, you can read the "Setup Development Environment" section below to learn about it.
- If you've fixed a bug or added code that should be tested, then add some tests.
- Make sure all the tests pass, you can read the "Testing" section below to learn about it.
- Run
pnpm run lint:jsandpnpm run lint:rsto check the code style. - If you've changed some Node.js packages, you should add a new changeset. Run
pnpm run changeset, select the changed packages and add the changeset info. - If you've changed some Rust packages, you should add a new changeset for
@rspack/bindingpackage. - Submit the Pull Request, make sure all CI runs pass.
- The maintainers will review your Pull Request soon.
When submitting a Pull Request, please note the following:
- Keep your PRs small enough, so that each PR only addresses a single issue or adds a single feature.
- Please include an appropriate description in the PR, and link related issues.
Format of PR titles
The format of PR titles follow Conventional Commits.
A example
feat(ui): Add `Button` component
^    ^    ^
|    |    |__ Subject
|    |_______ Scope
|____________ Type
Your PR
- must have a
Type - Optionally have a
ScopeScopeshould be lower case
- must have a
Subject
Minimal reproducible example
The rspack repro template can be used to create a minimal reproducible example.
A minimal reproducible example (MRE) is a code that is:
- Short
- Self-contained
- Demonstrates the problem being encountered
An MRE is essential because it allows us to quickly understand and reproduce your issue. This, in turn, increases the likelihood of getting a helpful and accurate response in a shorter amount of time. It is important to note that an MRE should not include extraneous code related to unrelated functionality, and should instead focus solely on the problem at hand.
Please see also How to create a Minimal, Reproducible Example from Stackoverflow.
About the team
If you need guidance or assistance with a specific area of the project, check out the CODEOWNERS file on GitHub. This file lists the preferred person to contact for each area.
Managing labels
This page explains the meanings of Rspack repository's labels.
C
Contribution welcome
G
Good first issue
rspack
This is the architecture of current rspack implementation
Table of Contents
Related PRs
Summary
The old architecture is a quite simple version, which only supports loaders for normal stage. Pitching loader does not put into consideration. The basic concept of the old version is to convert the normal loader to a native function which can be called from the Rust side. Furthermore, for performance reason, Rspack also composes loaders from the JS side to mitigate the performance issue of Node/Rust communications.
In this new architecture, loaders will not be converted directly into native functions. Instead, it is almost the same with how webpack's loader-runner resolves its loaders, by leveraging the identifier. Every time Rspack wants to invoke a JS loader, the identifiers will be passed to the handler passed by Node side to process. The implementation also keeps the feature of composing JS loaders for performance reason.
Guide-level explanation
The refactor does not introduce any other breaking changes. So it's backwards compatible. The change of the architecture also help us to implement pitching loader with composability.
Pitching loader
Pitching loader is a technique to change the loader pipeline flow. It is usually used with inline loader syntax for creating another loader pipeline. style-loader, etc and other loaders which might consume the evaluated result of the following loaders may use this technique. There are other technique to achieve the same ability, but it's out of this article's topic.
See Pitching loader for more detail.
Reference-level explanation
Actor of loader execution
In the original implementation of loader, Rspack will convert the normal loaders in the first place, then pass it to the Rust side. In the procedure of building modules, these loaders will be called directly:

The loader runner is only on the Rust side and execute the loaders directly from the Rust side. This mechanism has a strong limit for us to use webpack's loader-runner for composed loaders.
In the new architecture, we will delegate the loader request from the Rust core to a dispatcher located on the JS side. The dispatcher will normalize the loader and execute these using a modified version of webpack's loader-runner:

Loader functions for pitch or normal will not be passed to the Rust side. Instead, each JS loader has its identifier to uniquely represent each one. If a module requests a loader for processing the module, Rspack will pass identifier with options to the JS side to instruct the Webpack like loader-runner to process the transform. This also reduces the complexity of writing our own loader composer.
Passing options
Options will normally be converted to query, but some of the options contain fields that cannot be serialized, Rspack will reuse the loader ident created by webpack to uniquely identify the option and restore it in later loading process.
Optimization for pitching
As we had known before, each loader has two steps, pitch and normal. For a performance friendly interoperability, we must reduce the communication between Rust and JS as minimum as possible. Normally, the execution steps of loaders will look like this:

The execution order of the loaders above will looks like this:
loader-A(pitch)
   loader-B(pitch)
      loader-C(pitch)
   loader-B(normal)
loader-A(normal)
The example above does not contain any JS loaders, but if, say, we mark these loaders registered on the JS side:

The execution order will not change, but Rspack will compose the step 2/3/4 together for only a single round communication.
How to write a builtin plugin
Builtin plugin uses rspack_macros to help you avoid writing boilerplate code, you can use cargo-expand or rust-analyzer expand macro to checkout the expanded code, and for developing/testing these macro, you can starts with rspack_macros_test.
A simple example:
#![allow(unused)]
fn main() {
use rspack_hook::{plugin, plugin_hook};
use rspack_core::{Plugin, PluginContext, ApplyContext, CompilerOptions};
use rspack_core::CompilerCompilation;
use rspack_error::Result;

// define the plugin
#[plugin]
pub struct MyPlugin {
  options: MyPluginOptions
}

// define the plugin hook
#[plugin_hook(CompilerCompilation for MuPlugin)]
async fn compilation(&self, compilation: &mut Compilation) -> Result<()> {
  // do something...
}

// implement apply method for the plugin
impl Plugin for MyPlugin {
  fn apply(&self, ctx: PluginContext<&mut ApplyContext>, _options: &mut CompilerOptions) -> Result<()> {
    ctx.context.compiler_hooks.tap(compilation::new(self))
    Ok(())
  }
}
}
And here is an example.
If the hook you need is not defined yet, you can define it by rspack_hook::define_hook, compiler.hooks.assetEmitted for example:
#![allow(unused)]
fn main() {
// this will allow you define hook's arguments without limit
define_hook!(CompilerShouldEmit: AsyncSeriesBail(compilation: &mut Compilation) -> bool);
//           ------------------  --------------- -----------------------------  -------
//           hook name           exec kind       hook arguments                 return value (Result<Option<bool>>)

#[derive(Debug, Default)]
pub struct CompilerHooks {
  // ...
  // and add it here
  pub asset_emitted: CompilerAssetEmittedHook,
}
}
There are 5 kinds of exec kind:
- AsyncSeries, return value is
Result<()> - AsyncSeriesBail, return value is
Result<Option<T>> - AsyncParallel, return value is
Result<()> - SyncSeries, return value is
Result<()> - SyncSeriesBail, return value is
Result<Option<T>>
webpack
This is the architecture of webpack implementation
Table of Contents
Based on Webpack version: 5.73.0.
Summary
Explain how webpack loader works. Even though it's a little bit long and tedious, It's still a teeny-tiny peek at the loader system of Webpack.
Glossary
What's the meaning of a word used to describe a feature?
Why does the Webpack introduce this and what's the background of introducing this? What kind of problem Webpack was facing at the time?
Request Related
import Styles from '!style-loader!css-loader?modules!./styles.css';
- Inline loader syntax: The syntax that chains the loader together within the specifier, followed by the file requested. e.g.
!style-loader!css-loader?modules!./style.css request: The request with inline loader syntax retained. Webpack will convert relative URLs and module requests to absolute URLs for loaders and files requested. e.g.!full-path-to-the-loader-separated-with-exclamation-mark!full-path-to-styles.css
Resource Related
import xxx from "./index.js?vue=true&style#some-fragment"
-
resource: The absolute path to the requested file withqueryandfragmentretained but inline loader syntax removed. e.g.absolute-path-to-index-js.js?vue=true&style#some-fragment -
resourcePath: The absolute path to the requested file only. e.g.absolute-path-to-index-js.js -
resourceQuery: Query with question mark?included. e.g.?vue=true&style -
resourceFragment: e.g.#some-fragment -
inline match resource:
- Used to redirect the
module.rulesto another, which is able to adjust the loader chain. We will cover this later. - Ref: related PR Webpack Doc1 Webpack Doc2
- Used to redirect the
-
virtualResource:- The proposed solution to support asset type changing(A sugar to inline matchResource, which can also affect the asset filename generation)
- See more: the background of this property
Others but also important to note
- Virtual Module: A kind of module that does not locate in the real file system. But you can still import it. To create a virtual module, you need to follow the spec and it's also worth noting that Node.js and Webpack both support it under the scheme of
data:. Also known as,data:import. Doc to Node.js - Module types with native support: Webpack supports the following module types native:
'javascript/auto'|'javascript/dynamic'|'javascript/esm'|'json'|'webassembly/sync'|'webassembly/async'|'asset'|'asset/source'|'asset/resource'|'asset/inline', for those types you can use it without a loader. From webpack version 4.0+, webpack can understand more thanjavascriptalone.
Guide-level explanation
Loader configuration
The way that webpack controls what kind of module that each loader would apply is based on module.rules
const MiniExtractCssPlugin = require("mini-extract-css-plugin")

module.exports = {
  module: {
    rules: [
      {
        test: /\.vue$/,
        use: ["vue-loader"]
      },
      {
        test: /\.css$/,
        use: [MiniExtractCssPlugin.loader, "css-loader"]
      }
    ]
  },
  plugins: [new MiniExtractCssPlugin()]
}
Here is a simple option for the configuration of vue-loader. module.rules[number].test is a part rule to test whether a rule should be applied. For vue-loader alone, It's kind of confusing how webpack pass the result to the rule of css, we will cover this later. But for now, It's good to notice there is not only a test option alone to test if a rule should be applied. You can find it here for full conditions supported. Here're some examples of other conditions you can use.
module.exports = {
  module: {
    rules: [
      {
        test: /\.vue$/, // of course, test if the file extension match `vue`.
        scheme: "data", // if the specifier of a request starts with `data:`
        resourceQuery: "?raw", // if the `resourceQuery` matches then the rule will be applied. For this example, it's a great idea to apply a `raw-loader` here.
        type: "css" // use webpack's native resource handling for css
      }
    ]
  }
}
Examples
Vue(1 to n)
In a single file component(SFC) of Vue, there are commonly three blocks or more blocks(custom blocks) contained. The basic idea of implementing this loader is to convert it into JavaScript / CSS and let webpack handle the chunk generation(e.g. Style should be generated into a separate .css file)
<template></template>

<style></style>

<script></script>
⬇️⬇️⬇️⬇️⬇️⬇️
Vue-loader will firstly turn into the *.vue file into something like that.
import "script-path-to-vue-sfc";
import "template-path-to-vue-sfc";
import "style-path-to-vue-sfc";
You may find it weird how webpack handles these imports and build the transformed code. But if I change the code a little bit, you will find the idea.
import "script:path-to-vue-sfc";
import "template:path-to-vue-sfc";
import "style:path-to-vue-sfc";
and if we tweak the configuration a little bit to this, webpack will know exactly how to work with these import statements.
module.exports = {
  module: {
    rules: [
      {
        test: /\.vue$/,
        use: ["vue-loader"]
      },
      {
        scheme: "script",
        use: ["apply-your-javascript-loader", "vue-script-extract-loader"]
      },
      {
        scheme: "template",
        use: ["apply-your-javascript-loader", "vue-template-extract-loader"]
      },
      {
        scheme: "style",
        use: ["apply-your-style-loader", "vue-style-extract-loader"]
      }
    ]
  }
}
We added a few loaders to handle the splitting. I know it's still kind of weird here, but please stick with me and we will find a better way out.
- vue-script-extract-loader: extract the
scriptblock from a SFC file. - vue-style-extract-loader: extract the
styleblock from a SFC file. - vue-template-extract-loader: extract the
templateblock from a SFC file and convert it into JavaScript.
You will find it's really noisy only to transform a *.vue file, four loaders were introduced and I believe none of you would like to separate a simple loader into four. It's a real bummer! It will be great to use a single loader vue-loader alone. The current vue loader implementation uses resourceQuery to handle this. But how?
Loader optimizations I
We know that webpack uses a few conditions to handle whether a rule should be applied. Even with rule.test alone, the this.reousrceQuery is still available to loaderContext which developer could access it with this in any loader function(Don't worry if you still don't catch this. You will understand this after). Based on that, we change the rule to this:
module.exports = {
  module: {
    rules: [
      {
        test: /.vue$/,
        use: ["vue-loader"]
      }
    ]
  }
}
This indicates "If an import specifier is encountered, please pass me to vue-loader"! If you remember the import transformation above, we could adjust the transformation a little bit to this:
Before
import "script-path-to-vue-sfc";
import "template-path-to-vue-sfc";
import "style-path-to-vue-sfc";
After
import "path-to-vue-sfc.vue?script=true";
import "path-to-vue-sfc.vue?template=true";
import "path-to-vue-sfc.vue?style=true";
These requests will match the test: /.vue$/ above flawlessly and in the loader we can handle like this:
// pseudo code only for proofing of the concept
const compiler = require("some-vue-template-compiler")

const loader = function(source) {
  const {
    resourceQuery /* ?script=true or something else */,
    resourcePath /* path-to-vue-sfc.vue */
  } = this

  if (resourceQuery === "?script=true") {
    return compiler.giveMeCodeofScriptBlock(this.resourcePath) // javascript code
  } else if (resourceQuery === "?template=true") {
    return compiler.giveMeCodeofTemplateBlock(this.resourcePath) // javascript code
  } else if (resourceQuery === "?style=true") {
    return compiler.giveMeCodeofStyleBlock(this.resourcePath) // style code
  } else {
    return `
    	import `${this.resourcePath}?script=true`;
    	import `${this.resourcePath}?template=true`;
    	import `${this.resourcePath}?style=true`;
    `
  }
}

module.exports = loader
You can see the loader for the example above will be used for four times.
- Encounter a
*.vuefile, transform the code to a few import statements - For each import statement introduced in the first transformation, the loader will be used again as they share the same extension
vue.
Is this the end? No! Even if you wrote the code like this, it will still fail to load.
- For CSS: You haven't tell webpack a way to handle the CSS, remember the CSS part is required to go through the
css-loaderand thenmini-css-extract(if you want to generate CSS for chunk) orstyle-loader(if you want to append it directly to the DOM). After all, you have to make the result of style to pass these loaders. - For JS: You haven't transformed the code to any transpilers, It will be failed if your runtime doesn't support the syntax(maybe in TypeScript for example) and webpack internal acorn compiler does not have the ability to help you with that.
Pass the code to the corresponding loaders
We tweak the configuration a little bit again.
module.exports = {
  module: {
    rules: [
      {
        test: /.vue$/,
        use: ["vue-loader"]
      },
      {
        test: /.css$/,
        use: [MiniCssExtractPlugin.loader, "css-loader"]
      },
      {
        test: /.js$/,
        use: ["babel-loader"]
      }
    ]
  }
}
It looks a bit more like the "normal" Webpack configuration. Note that the rule.test is based on the file extension, so vue-loader did a little bit of hack here.
// pseudo code only for proofing of the concept
const compiler = require("some-vue-template-compiler")

const loader = function(source) {
  const {
    resourceQuery /* ?script=true or something else */,
    resourcePath /* path-to-vue-sfc.vue */
  } = this

  if (resourceQuery === "?script=true") {
    const code = compiler.giveMeCodeofScriptBlock(this.resourcePath) // javascript code
    this.resourcePath += ".js"
    return code
  } else if (resourceQuery === "?template=true") {
    const code = compiler.giveMeCodeofTemplateBlock(this.resourcePath) // javascript code
    this.resourcePath += ".js"
    return code
  } else if (resourceQuery === "?style=true") {
    const code = compiler.giveMeCodeofStyleBlock(this.resourcePath) // style code
    this.resourcePath += ".css" // based on the `lang` in each script, the extension will be set accordingly.
    return code
  } else {
    return `
    	import `${this.resourcePath}?script=true`;
    	import `${this.resourcePath}?template=true`;
    	import `${this.resourcePath}?style=true`;
    `
  }
}

module.exports = loader
Webpack uses resourcePath to match a module.rules. So this hack will let webpack treat blocks accordingly as if they are real files with extensions of js | css |... .
Finally! But this is only a proof of concept, for the real implementation. You should definitely check out the vue-loader yourself.
Loader Optimization II
Well done! We implemented a simple and rudimentary version of vue-loader. However, the real pain-in-the-ass part of this implementation is hacking the extension to match the configuration. But since almost every user would have other js | css files included in the project, so vue team decide to use this kind of strategy to reuse the user configuration.
Except for hacking the extension, webpack then provided a more legit way to handle this kind of rule matching problem which is known as inline match resource (We covered it in the glossary part).
inline match resource
Webpack can do almost anything with an import specifier like the loader chaining we covered in the glossary part. Inline source match is another case. By taking the advantage of it, you can force an import statement to go through a module.rules by introducing the !=! syntax. For example, if we want to force a css file to go through a less loader, it will be look like this:
module.exports = {
  module: {
    rules: [
      {
        test: /.less$/,
        use: ["style-loader", "css-loader", "less-loader"]
      }
    ]
  }
}
// This import should be converted with a loader

// treat the file as `less`
import "./index.css.less!=!./index.css"
The slice before the !=! is a way to modify the extension of a single file and force it to match the module.rules and this transformation is often done in a loader, or you will make your application code specialized for Webpack only.
After going through the basic example, let's see how we're going to optimize out the hack used in vue-loader.
// pseudo code only for proofing of the concept
const compiler = require("some-vue-template-compiler")

const loader = function(source) {
  const {
    resourceQuery /* ?script=true or something else */,
    resourcePath /* path-to-vue-sfc.vue */
  } = this

  if (resourceQuery === "?vue=true&script=true") {
    return compiler.giveMeCodeofScriptBlock(this.resourcePath) // javascript code
  } else if (resourceQuery === "?vue=true&template=true") {
    return compiler.giveMeCodeofTemplateBlock(this.resourcePath) // javascript code
  } else if (resourceQuery === "?vue=true&style=true") {
    return compiler.giveMeCodeofStyleBlock(this.resourcePath) // style code
  } else {
    return `
    	import `${this.resourcePath}.js!=!${this.resourcePath}?vue=true&script=true`;
    	import `${this.resourcePath}.js!=!${this.resourcePath}?vue=true&template=true`;
    	import `${this.resourcePath}.css!=!${this.resourcePath}?vue=true&style=true`;
    `
  }
}

module.exports = loader
Webpack will internally use the match resource part(before !=!) as the data to match loaders. In order to let vue-loader match the resource. We have two options:
- Loose test
- Inline loader syntax
1. Loose test
module.exports = {
  module: {
    rules: [
      {
        test: /\.vue/, // original: `/\.vue$/`, we removed the `$` to allow resources with `.vue` included to match this rule.
        use: ["vue-loader"]
      }
    ]
  }
}
We removed the $ to allow resources with .vue included matching this rule. Personally speaking, this is not a good idea, because a loose match might cause mismatches.
2. Inline loader syntax
// vue-loader/index.js

module.exports = function() {
 // ... code omitted
	return `
  	import `${this.resourcePath}.js!=!${__filename}!${this.resourcePath}?vue=true&script=true`;
  	import `${this.resourcePath}.js!=!${__filename}!${this.resourcePath}?vue=true&template=true`;
  	import `${this.resourcePath}.css!=!${__filename}!${this.resourcePath}?vue=true&style=true`;
	`
}
This technique is to take advantage of the inline loader syntax to force the loader to go through the vue loader. This tackles down the tangible mismatching ideally and we can still retain the test regex /\.vue$/ as-is.
Final art and conclusion
Configuration
module.exports = {
	module: {
    rules: [
      {
        test: /\.vue$/,
        use: ["vue-loader"]
      },
      // ... other rules for js, or css, etc.
    ]
  }
}
Loader
// pseudo code only for proofing of the concept
const compiler = require("some-vue-template-compiler")

const loader = function(source) {
  const {
    resourceQuery /* ?script=true or something else */,
    resourcePath /* path-to-vue-sfc.vue */
  } = this

  if (resourceQuery === "?vue=true&script=true") {
    return compiler.giveMeCodeofScriptBlock(resourcePath) // javascript code
  } else if (resourceQuery === "?vue=true&template=true") {
    return compiler.giveMeCodeofTemplateBlock(resourcePath) // javascript code
  } else if (resourceQuery === "?vue=true&style=true") {
    return compiler.giveMeCodeofStyleBlock(resourcePath) // style code
  } else {
    return `
    	import `${this.resourcePath}.js!=!${__filename}!${resourcePath}?vue=true&script=true`;
    	import `${this.resourcePath}.js!=!${__filename}!${resourcePath}?vue=true&template=true`;
    	import `${this.resourcePath}.css!=!${__filename}!${resourcePath}?vue=true&style=true`;
    `
  }
}

module.exports = loader
Conclusion
Vue-loader is quite complex. The basic needs of the loader are:
- Separate a
*.vuefile request into a number of parts. For each block, explicitly change the resource matching mechanism (using inline match resource). The killer inline match resource not only gives us great composability with user-defined loaders, but also the ability to interact with webpack supported native types, and we will cover this part late. - When requesting the
vue-loaderagain for a block, the code of each block is returned and let webpack handle the changed matched resource(e.g../App.vue.css) with user-defined loaders (Webpack did this internally).
Use natively supported module types
We know that webpack only supports JavaScript in the old time, from the version of 4.0.0+(changelog)
Simplified pre-processor's configuration
With the experimental support of CSS. A.K.A webpack knows how to handle CSS files natively.
Before
module.exports = {
  module: {
    rules: [
      {
        test: /\.less$/,
        use: ["style-loader", "css-loader", "less-loader"],
        type: "javascript/auto" // this field is a implicit one, if not defined, it will be set to `"javascript/auto"`
      }
    ]
  }
}
After
module.exports = {
  module: {
    rules: [
      {
        test: /\.less$/,
        use: ["less-loader"],
        type: "css"
      }
    ]
  },
  experiments: {
    css: true
  }
}
With experiments.css on, webpack can experimentally understand the parsing and generating of css files which gets rid of css-loader and style-loader. For the full list of natively supported Rule.type, you can find it here.
Asset modules
From webpack 4.0.0+, assets are supported natively
module.exports = {
  module: {
    rules: [
      {
        test: /\.(png|jpg)/,
        type: "asset"
      }
    ]
  }
}
Rule.type === "asset" indicates the asset will be automatically tested whether it's going to be inlined or emitted as a file on the real file system. The possible options are: 'asset' | 'asset/source' | 'asset/resource' | 'asset/inline'
Svgr
Webpack loader will read the source to a UTF-8 string by default. For SVG files, this would fit the webpack load defaults.
// Proof of concept of svgr-loader
module.exports = function(source) {
  if (this.resourceQuery === "?svgr=true") { // the real transform part
    let { code } = svgrTransformer.transform(source);
    return code
  }
  return `require("${this.resourcePath}.jsx!=!${__filename}!${this.resourcePath}?svgr=true")` // the request part
}
Again here we use double-pass to firstly convert each request to the request part with inline match resource, and do the real request with query ?svgr=true, and let inline match resource handle the jsx conversion. Before that, we have to call a third-party jsx transformer, could be ESBuild for example, for which we cannot reuse other module.rules set by the user-side. Inline match resource saved our ass again!
Scheme imports
Supported in Webpack version 5.38.0, doc: Rule.scheme
// JavaScript
import x from "data:text/javascript,export default 42"
console.log('x:',x);
/* CSS */
@import ("data:text/css, body { background: #fff; }");
Webpack handles data: imports for JavaScript internally.
Asset transform and rename
Asset: This is a general term for the images, fonts, media, and any other kind of files that are typically used in websites and other applications. These typically end up as individual files within the output but can also be inlined via things like the style-loader or url-loader.
Originally posted at Webpack Glossary
Default resource reading override
Asset could be formatted in both text(*.svg) or binary (*.png / *.jpg). For loaders, webpack provides you an option raw to override the default and built-in resource reading strategy from UTF-8 string to Buffer:
module.exports = function(source /* Buffer */ ) {
  // loader implementation
}

module.exports.raw = true
Transform and rename
Image there is a need to transform an asset formatted with png to jpg. There is two abilities that webpack needs to support:
- Handle the asset with
rawcontent, or aBuffer. We can simply override the default resource reading behavior by exportingraw(covered before). - Change the filename, and reuse the loader for both
pngandjpg
Configuration
module.exports = {
  module: {
    rules: [
      {
        test: /\.png/,
        use: ["png-to-jpg-loader"] // some png to jpg loader, we will implement this
      },
      {
        test: /\.jpg/,
        use: ["jpg-optimizer"] // some jpg optimizer, we will not covert this,
        type: "asset/resource"
      }
    ]
  }
}
- Rule1: For files with extension
png, we want to use apngtojpgloader, which will be covered in this article. - Rule2:
- For files with extension
jpg, we want to use a third-partyjpg-optimizer, which will not be covered in this article. type: "asset/resource": As soon as all the loaders have gone through, we want webpack to emit the file as an external resource on the file system regardless of the file size(type: "asset"will automatically detect the size of an asset to determine whether an asset will be inline-included for dynamically imported from file system).
- For files with extension
- For those
jpgfiles converted frompng, we want them to apply with thejpg-optimizertoo(i.e. reuse the loaders defined inmodule.rules)
Loader
module.exports = function(source) {
  if (this.resourceQuery === "?pngToJPG=true") {
    return pngToJpg.transform(source)
  }

  return `require("${this.resourcePath}.jpg!=!${__filename}${this.resourcePath}?pngToJPG=true")`
}

module.exports.raw = true
We use double-pass again, firstly we convert the extension to .jpg which will apply the matched rules(in this case test: /\.jpg/), after the transformation of png-to-jpg-loader. Generated asset module filename will be based on the inline match resource, which is xxxx.jpg in this case.
AST reuse
Webpack provides a way to pass metadata(the forth parameter) among the chaining loaders doc. The most commonly used value is webpackAST which accepts an ESTree compatible(webpack internally uses acorn) AST, which hugely improves the performance since webpack instead of parsing the returned code to AST again, will directly use the AST(webpackAST) returned from a loader(But the work of a complete walking of an AST can not be omitted as it's necessary for webpack for do some analysis for its dependencies and will be only done once, so it is not a big overhead.)
module.exports = function(source) {
  let ast = AcornParser.parse(source, {
    // options
  })

  this.callback(null, '', null, {
    webpackAST: ast
  })
}
Good to note that only ESTree is compatible, so you cannot pass a CSS AST, or webpack will complain with "webpackAst is unexpected for the CssParser". It will be ok if you don't get this, let's move to the reference-level explanation for analysis in-depth.
Reference-level explanation
This is the reference-level explanation part of webpack's internal loader implementation.
Loader composability
If you don't quite get this concept, you may refer to the Glossary and Example part of the Guide-level explanation first and pick up this as soon as you finished.
The high-level idea of previously talked inline match resource is to let loader developers to customize the behavior of matching to match the pre-defined module.rules. It's an API to write composable loaders. But what does composition mean? For those users who are familiar with React hooks and Vue composable APIs, you may get this faster. Actually, webpack provides a lot of ways to help loader developers and users do the composition.
User-defined loader flows
module.exports = {
  module: {
 	  rules: [
      {
        test: /\.js$/,
        use: ["babel-loader"],
        type: "javascript/auto"
      },
      {
        test: /\.svg$/,
        use: ["svgr-loader", "svgo-loader"],
      }
    ]
  }
}
Webpack users can take the advantage of module.rules[number].use with a loader list for each request that matches the corresponding conditions. Note that I use the wording of request, not the file , which can include a request to data:text/javascript not the files on the real file system only. (In Parcel bundler, it's called pipelines, but this will not be covered in this article.)
Apparently, user-declared loader flow is not able to cover up every case that a loader wants. You can see from the previous examples, vue-loader wants to split a file into many blocks, and remain the reference to it. svgr-loader wants to do the transformation first and let other loaders deal with the jsx. svg-loader wants to use the internal ability of Asset Module to let Webpack decide whether an asset is inlined or emitted to the real file system. and there are more to come... Based on the complexity of the loader, Webpack also provides a syntax to allow loader implementors to do the composition by themselves.
The syntax for loader composition
Inline loader syntax (Chaining loaders)
Supported from webpack v1 chaining-loaders
It's possible to specify loaders in an
importstatement, or any equivalent "importing" method. Separate loaders from the resource with!. Each part is resolved relative to the current directory. doc
import Styles from '!style-loader!css-loader?modules!./styles.css';
The inline loader syntax executes each loader for each request from right to left. Webpack handles the interaction with user-defined loaders carefully. So by default, the user-defined normal loader will be executed prior to the inline loaders, you can disable this behavior by prefixing ! , (full reference could be found here doc).
The custom specifier is parsed before the module.rules as the inline loader syntax interferes the user-defined loaders(See the source code). Then, webpack will get the module.rules combined with the required conditions to calculate the matching rule set (See the source code).
At the moment, you cannot change the matching behavior with the syntax, loaders are always matched with the provided resourcePath, etc, which leads to a bunch of hack code in the implementations of loaders (see this code snippet in vue-loader). The possibilities for changing the matching behavior leaves to the later-coming inline match resource.
Nevertheless, the architecture of Loader at this moment is sound and solid. Another good example is the implementation-nonrelative filter(i.e. the filtering logic of Loader is not declared in the loader itself), which is the fundamental root of loader composition, or the implementor will do a lot of hacks. (It's way too dirty to talk about here, but you can take the rollup svgr plugin as a reference)
In conclusion, inline loader syntax gives us a chance to control the loader flow with user-defined rules.
Inline match resource
To extend the matching ability, inline match resource enables loader implementors to reuse some of the user-defined configurations with more flexibilities.
On top of the previous example, webpack also provides a way to make use of the natively-supported module types.
// For module type `css` to work, you need to enable `experiments.css`
import "./style.less.webpack[css]!=path-to-less-loader!./style.less"
// webpack.config.js
module.exports = {
  experiments: {
    css: true
  }
}
Given the configuration above, the overview of the complete flow will be like this:
- Webpack: Parse the specifier of the import and create the loader for the current request
- Webpack: Merge the result from the second step with a user-defined
module.rulesinwebpack.config, in this case is[] - Webpack: load
style.lessas UTF-8 string - Less-loader: Accept the UTF-8 string as the first parameter of the loader function and transform it to the content of
css. - Webpack: Call the registered native
CSSparser, and later at the code generation step the registered nativeCSSgenerator generates the result.
For asset modules, you can also use this:
import "./logo.png.jpg.webpack[asset/resource]!=path-to-loaders!./logo.png"
The first part, also known as matchResource will be used as a part of the filename of the final code generation. (See the source code)
Performance optimizations
Before moving on to the detailed implementations, here's some glossary to support your understanding the architecture as a whole.
Glossary
NormalModuleFactory: A factory used to create aNormalModule, which basically exposes acreatemethod.NormalModule: A module in Webpack most of the time is aNormalModule, but with different implementations ofparser/generator/Module Type, the module could be almost any kind, and also exposes abuildmethod. For example, aNormalModulewith JavaScript parser, JavaScript generator, andtype ===javascript/autowill be regarded as a module with JavaScript-related functionalities. Also, good to note that a module may not exist on the real file system, takingdata:for example.
The module creation workflow
This will only introduce a slice of webpack's internal implementation from the Loader's perspective, for more you should directly refer to the source code.
When an import statement is detected, webpack will initialize a module creation. Based on the type of Dependency (an abstraction of webpack, it's not important here), webpack can find the linked ModuleFactory(The abstraction class), in most cases, the derived factory is NormalModuleFactory, which exposes a create method.
Prepare data needed for module creation
The NormalModuleFactory#create is used to provide enough information to create a real NormalModule, and create the NormalModule. In the create method, webpack basically does these things(some non-loader related stuff will be omitted):
- Resolve loaders from request: resolve the request, parse inline loader syntax: This contains inline match resource, inline loader syntax.
- Do the analysis on the parsed loader syntax, to decide whether a user-defined
normal/post/preloader is going to be included. doc - Resolve Resource: resolve resource to the absolute path, fragments, queries, etc(These stuff are also provided in
LoaderContext). For the full source code you may refer to this - Use the resolved resource data to match
module.rulesdefined in the configuration, and get the matched rules. This is also a part of the module creation data. - Do some special logic with inline match resource, since match resource ends like
.webpack[css]would changeRule.type. Also store the match resource data, since it might affect the filename generation for asset modules.
Create a module based on the prepared data
After the data needed for module creation is prepared, NormalModuleFactory will new NormalModule with the data provided. It contains basically every that a NormalModule needs (see the source code). Most importantly, the loaders. It contains every loader parsed and ordered from the create step.
The module build step
The module build step is kind of clear. Webpack will invoke the build method for each NormalModule instance, which invokes loader-runner(see the source code) to go through every loader that was analyzed from the create step. It's clear to know that the composition of loaders is happening on the same module.
A peek of the support of Module Types
As far as this article goes, It might be getting a little bit tedious. But have you ever wondered how webpack supports these module types natively? I think It's still worth telling you about it to get a more complete understanding of the AST optimizations. For the support of JavaScript, webpack's JavaScript plugin will register different types of parser and generators for each module types, which will be used as the parser / generator to a NormalModule (see the source code).
Reusing AST in Webpack
Based on the parser and generator we introduced before, webpack did a little hack around the fourth parameter of this.callback (from loaderContext), with webpackAST, after each loader call, the webpackAST will be stored in the context of loader, and passed again to the next loader. Finally, the AST will be passed to the parser(It could be any type, based on the module type, but webpack makes it a JavaScript only for AST) (see the source code).
Here's an issue about trying to use SWC's AST to get rid of the time sensitive code parsing from Acorn Parser, but they are facing some AST compatibility issues and performance issues about the overhead of interop with native code(Rust).
References
-
loader plugin api design (Analysis) #315
-
RFC-011 Supports
data:text/javascriptprotocol #457 -
Webpack:
matchResourcewith natively-supported module types doc -
Webpack: Loader context doc
-
Webpack: Module rules doc
-
SWC-loader for performance optimizations issue
Based on Webpack version: 5.73.0. Some source code is omitted for cleaner demonstration in the example.
Summary
Explain how webpack dependency affects the compilation and what kind of problem that webpack was facing at the moment and the solution to the problem.
Glossary
What's the meaning of a word used to describe a feature?
Why does the Webpack introduce this and what's the background of introducing this? What kind of problem Webpack was facing at the time?
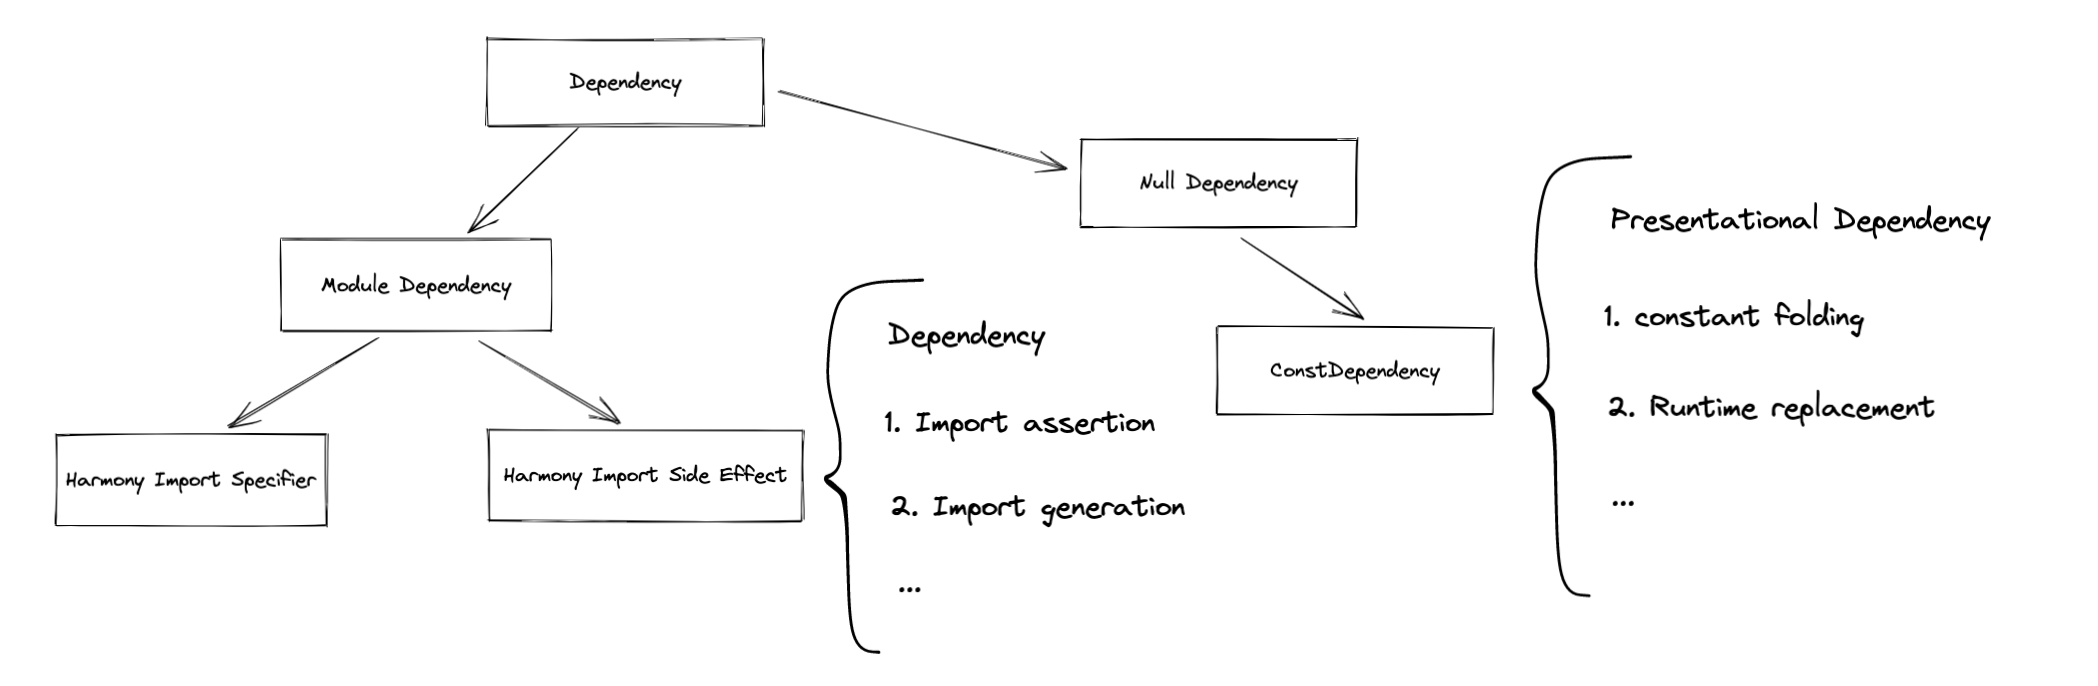
High-level presentations of Dependencies
- Dependency(fileDependency): An existing dependency that is marked as watchable. This is the widely-used type of dependency. CSS Preprocessors like
postcssstrongly depend on this in order to mark its dependency watchable. - ContextDependency: Most useful for requests in which Glob and Regexp were used. For real-world usage, see [this](https://webpack.js.org/guides/dependency-management/#require-with-expression).
- MissingDependency: A missing dependency to mark it watchable (handles the creation of files during compilation before watchers are attached correctly.)
- BuildDependency: Related to persistent cache.
- PresentationalDependency: Dependencies that only affect presentation are mostly used with their associated template.
Others
- LoaderContext: Context provided by Webpack loader-runner, which can be accessed through
thisin each loader function. - ModuleGraph: A graph to describe the relationship between modules.
Guide-level explanation
Dependency
dependency(fileDependency) stands for the file dependency among missingDependency and contextDependency, etc. The created dependency will be marked as watchable, which is useful in Hot Module Replacement in developer mode.
The implicit behavior for webpack internally in the case below is to create two dependencies internally.
import foo from "./foo";
import "./style.css";
ContextDependency
contextDependency is mostly used in scenarios where we want to dynamic load some module in runtime. In this case, webpack cannot assure which module it will be included in the final bundle at compile time. In order to make the code runnable in runtime, webpack has to firstly create multiple bundle modules corresponding to the matching filename such as ./components/a.js and ./components/b.js, etc.
// index.js
import("./components" + componentName).then(...)
// components/a.js
...
export default ComponentA;
// components/b.js
...
export default ComponentB;
For loaders, you can access to this.addContextDependency in each loader function.
For plugins, you can access via module.buildInfo.contextDependencies.
Reference-level explanation
The abstraction of Dependency of Webpack was introduced in Webpack version 0.9 with a big refactor. Redirect to the commit
Stakeholders of Dependency
High-level

Low-level
How dependencies affect the creation of module graph?
Duplicated module detection
Each module will have its own identifier, for NormalModule, you can find this in NormalModule#identifier. If the identifier will be duplicated if inserted in this._module, then webpack will directly skip the remaining build process. [source]
Basically, an NormalModule identifier contains these parts:
type[string]: The module type of a module. If the type of the module isjavascript/auto, this field can be omittedrequest[string]: Request to the module. All loaders whether it's inline or matched by a config will be stringified. If inline match resource exists, inline loaders will be executed before any normal-loaders after pre-loaders. A module with a different loader passed through will be treated as a different module regardless of its path.layer: applied if provided
Module resolution
getResolve is a loader API on the LoaderContext. Loader developers can pass dependencyType to its option which indicates the category of the module dependency that will be created. Values like esm can be passed, then webpack will use type esm to resolve the dependency.
The resolved dependencies are automatically added to the current module. This is driven by the internal plugin system of enhanced-resolve. Internally, enhanced-resolve uses plugins to handle the dependency registration like FileExistsPlugin [source] to detect whether a file is located on the file system or will add this file to a list of missingDependency and report in respect of the running mode of webpack. The collecting end of Webpack is generated by the getResolveContext in NormalModule [source]
Module dependency in ModuleGraph
Here's a module graph with esm import between modules:
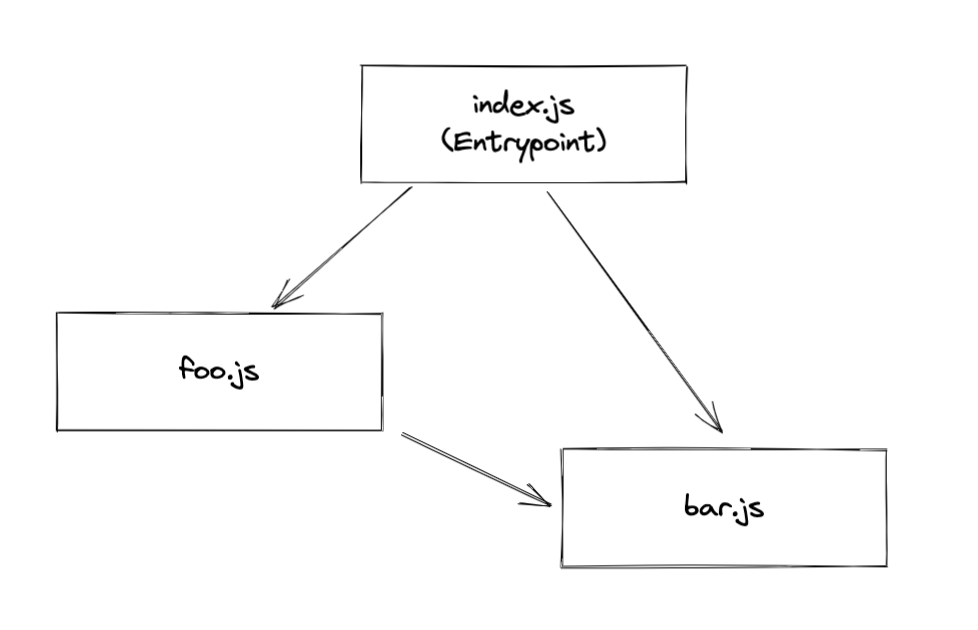
The dependency type introduced by import or require is a derived dependency: ModuleDependency.
A ModuleDependency contains three important fields.
category: used to describe the category of dependency. e.g. "esm" | "commonjs"request: see the explanation above.userRequest: Resource and its inline loader syntax will be stringified and applied, but loaders inmodule.ruleswill be omitted.
It's also good to note a field we will talk about later:
assertions: assertions inimport xx from "foo.json" assert { type: "json" }
More fields can be found in abstract class of Dependency and ModuleDependency. source: Dependency source: ModuleDependency
// null -> index.js

EntryDependency {
  category: "esm",
  request: "./index.js",
  type: "entry",
  _parentModule: undefined
}
// index.js -> foo.js

HarmonyImportSideEffectDependency {
  category: "esm",
  request: "./foo",
  type: "harmony side effect evaluation",
  _parentModule: NormalModule { identifier: "index.js" }
}
// index.js -> bar.js

HarmonyImportSideEffectDependency {
  category: "esm",
  request: "./bar",
  type: "harmony side effect evaluation",
  _parentModule: NormalModule { identifier: "index.js" }
}
// bar.js -> foo.js
HarmonyImportSideEffectDependency {
  category: "esm",
  request: "./foo",
  type: "harmony side effect evaluation",
  _parentModule: NormalModule { identifier: "bar.js" }
}
Resolving a module
ModuleDependencies with different dependency category such as esm or commonjs will affect the resolving part. For ECMAScript modules, they may prefer "module" to "main", and for CommonJS modules, they may use "main" in package.json. On top of that, conditional exports are also necessary to be taken into account. doc
Different types of module dependencies
ESM-related derived types
There are a few of ModuleDependencies introduced in ESM imports. A full list of each derived type can be reached at [source]
Import
HarmonyImportDependency
The basic type of harmony-related module dependencies are below. [source]
HarmonyImportSideEffectDependency
import { foo, bar } from "./module"
import * as module from "./module"
import foo from "./module"
import "./module"
Every import statement will come with a HarmonyImportSideEffectDependency, no matter how the specifiers look like. The speicifier will be handled by HarmonyImportSpecifierDendency below.
The field assertions will be stored if any import assertions exist for later consumption.
The field category will be used as dependencyType to resolve modules.
HarmonyImportSpecifierDependency
import { foo, bar } from "./module"
import * as module from "./module"
import foo from "./module"
Example:
import { foo, bar } from "./module"

console.log(foo, bar)
Specifier will be mapped into a specifier dependency if and only if it is used. JavaScript parser will first tag each variable [source], and then create corresponding dependencies on each reading of dependency. [source] and finally be replaced to the generated importVar.
Export(They are not module dependencies to be actual, but I placed here for convenience)
HarmonyExportHeaderDependency
PresentationalDependency
export const foo = "foo";
export default "foo";
This is a presentational dependency. We will take more time on this later.
HarmonyExportSpecifierDependency
export const foo = "foo"; // `foo` is a specifier

HarmonyExportSpecifierDependency {
  id: string;
  name: string;
}
HarmonyExportExpressionDependency
export default "foo"; // "foo" is an expression

HarmonyExportExpressionDependency {
 range: [number, number] // range of the expression
 rangeStatement: [number, number] // range of the whole statement
}
How dependencies affect code generation
Presentational dependency
A type of dependency that only affects code presentation.
ConstDependency
ConstDependency {
  expression: string
  range: [number, number]
  runtimeRequirements: Set<string> | null
}
You can think of the passed expression as a replacement for the corresponding range. For the real world example, you can directly refer to Constant Folding.
Template
Remember the fact that Webpack is an architecture wrapped around source code modifications. Template is the solution that helps Webpack to do the real patch on the source code. Each dependency has its associated template which affects a part of the code generation scoped per dependency. In other words, the effect of each template is strictly scoped to its associated dependency.
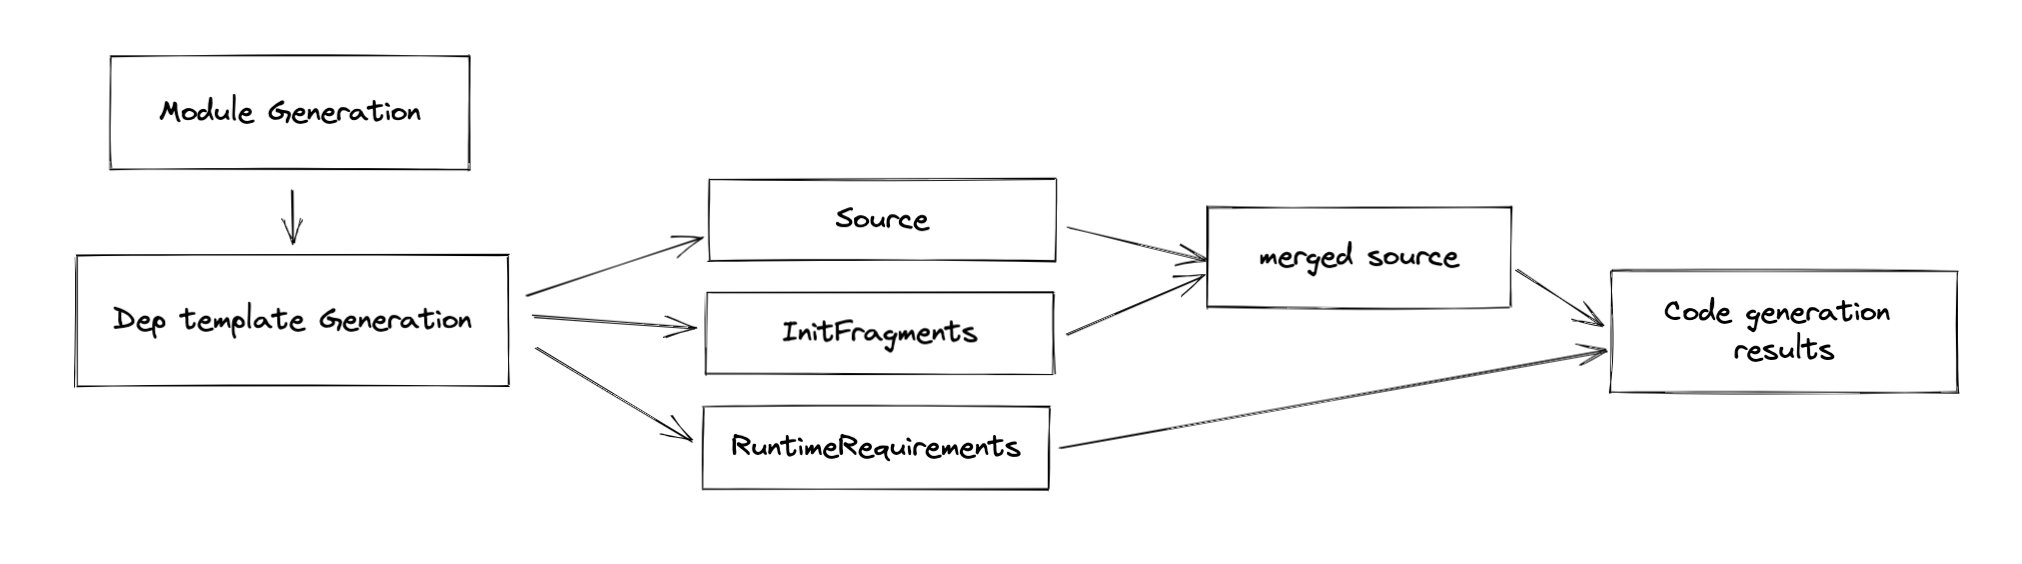
There are three types of modification:
sourcefragmentsruntimeRequirements
A boilerplate of the dependency template looks like this:
class SomeDependency {}

SomeDependency.Template = class SomeDependencyTemplate {
   /**
	 * @param {Dependency} dependency the dependency for which the template should be applied
	 * @param {ReplaceSource} source the current replace source which can be modified
	 * @param {DependencyTemplateContext} templateContext the context object
	 * @returns {void}
	 */
   apply(dependency, source, templateContext) {
      // do code mod here
   }
}
There are three parameters in the function signature:
- dependency: The associated dependency of this template
- source: The source code represent in
ReplaceSource, which can be used to replace a snippet of code with a new one, given the start and end position - templateContext: A context of template, which stores the corresponding
module,InitFragments,moduleGraph,runtimeRequirements, etc. (not important in this section)
Source
Again, given an example of ConstDependency, even if you don't have an idea what it is, it doesn't matter. We will cover this in the later sections.
The associated template modifies the code with Source(ReplaceSource to be more specific):
ConstDependency.Template = class ConstDependencyTemplate extends (
	NullDependency.Template
) {
	apply(dependency, source, templateContext) {
		const dep = /** @type {ConstDependency} */ (dependency);

        // not necessary code is removed for clearer demonstration

        if (dep.runtimeRequirements) {
			for (const req of dep.runtimeRequirements) {
				templateContext.runtimeRequirements.add(req);
			}
		}

		source.replace(dep.range[0], dep.range[1] - 1, dep.expression);
	}
};
runtimeRequirements
As you can see from the Source section above, there is another modification we talked about: runtimeRequirements, It adds
runtime requirements for the current compilation. We will explain more in the later sections.
Fragments
Essentially, a fragment is a pair of code snippet that to be wrapped around each module source. Note the wording "wrap", it could contain two parts content and endContent [source]. To make it more illustrative, see this:
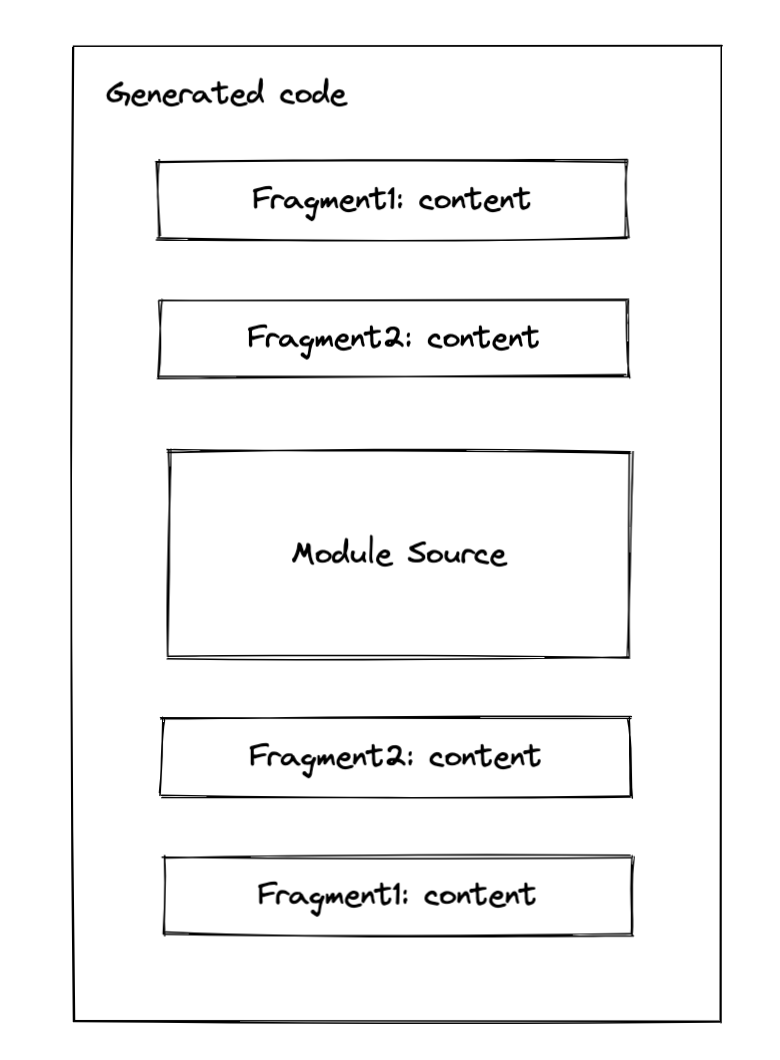
The order of the fragment comes from two parts:
- The stage of a fragment: if the stage of two fragments is different, then it will be replaced corresponding to the order define by the stage
- If two fragments share the same order, then it will be replaced in position order. [source]
A real-world example
import { foo } from "./foo"

foo()
Given the example above, here's the code to generate a dependency that replaces import statement with __webpack_require__.
// some code is omitted for cleaner demonstration
parser.hooks.import.tap(
        "HarmonyImportDependencyParserPlugin",
              (statement, source) => {
	              const clearDep = new ConstDependency(
		              "",
		              statement.range
	              );
	              clearDep.loc = statement.loc;
	              parser.state.module.addPresentationalDependency(clearDep);

	              const sideEffectDep = new HarmonyImportSideEffectDependency(
		              source
	              );
	              sideEffectDep.loc = statement.loc;
	              parser.state.module.addDependency(sideEffectDep);

	              return true;
              }
);
Webpack will create two dependencies ConstDependency and HarmonyImportSideEffectDependency while parsing [source].
Let me focus on HarmonyImportSideEffectDependency more, since it uses Fragment to do some patch.
// some code is omitted for cleaner demonstration
HarmonyImportSideEffectDependency.Template = class HarmonyImportSideEffectDependencyTemplate extends (
	HarmonyImportDependency.Template
) {
	apply(dependency, source, templateContext) {
		super.apply(dependency, source, templateContext);
	}
};
As you can see in its associated template [source], the modification to the code is made via its superclass HarmonyImportDependency.Template [source].
// some code is omitted for cleaner demonstration
HarmonyImportDependency.Template = class HarmonyImportDependencyTemplate extends (
	ModuleDependency.Template
) {
	apply(dependency, source, templateContext) {
		const dep = /** @type {HarmonyImportDependency} */ (dependency);
		const { module, chunkGraph, moduleGraph, runtime } = templateContext;

		const referencedModule = connection && connection.module;

		const moduleKey = referencedModule
			? referencedModule.identifier()
			: dep.request;
		const key = `harmony import ${moduleKey}`;

                 // 1
		const importStatement = dep.getImportStatement(false, templateContext);
                 // 2
		templateContext.initFragments.push(
			new ConditionalInitFragment(
				importStatement[0] + importStatement[1],
				InitFragment.STAGE_HARMONY_IMPORTS,
				dep.sourceOrder,
				key,
				// omitted for cleaner code
			)
		);
	}
}
As you can see from the simplified source code above, the actual patch made to the generated code is via templateContext.initFragments(2). The import statement generated from dependency looks like this.
/* harmony import */ var _foo__WEBPACK_IMPORTED_MODULE_0__ = __webpack_require__(/*! ./foo */ "./src/foo.js"); //(1)
Note, the real require statement is generated via initFragments, ConditionalInitFragment to be specific. Don't be afraid of the naming, for more information you can see the background of this fragment, which let's webpack to change it from InitFragment to ConditionalInitFragment.
How does webpack solve the compatibility issue?
For ESM modules, webpack will additionally call a helper to define _esModule on exports as an hint:
__webpack_require__.r(__webpack_exports__);
The call of a helper is always placed ahead of any require statements. Probably you have already get this as the stage of STAGE_HARMONY_EXPORTS has high priority than STAGE_HARMONY_IMPORTS. Again, this is achieved via initFragments. The logic of the compatibility helper is defined in this file, you can check it out.
Runtime
Runtime generation is based on the previously collected runtimeRequirements in different dependency templates and is done after the code generation of each module. Note: it's not after the renderManifest, but it's after the code generation of each module.
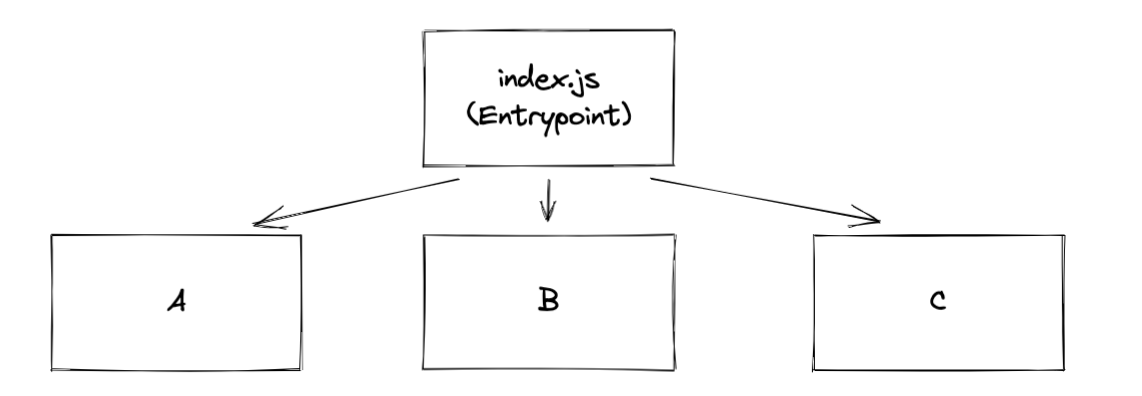 In the first iteration of collection, Sets of
 runtimeRequirements are collected from the module's code generation results and added to each ChunkGraphModule.
In the second iteration of collection, the collected runtimeRequirements are already stored in ChunkGraphModule, so Webpack again collects them from there and stores the runtimes required by each chunk of ChunkGraphChunk. It's kind of the hoisting procedure of the required runtimes.
Finally, also known as the third iteration of collection, Webpack hoists runtimeRequirements from those chunks that are referenced by the entry chunk and get it hoisted on the ChunkGraphChunk using a different field named runtimeRequirementsInTree which indicates not only does it contains the runtime requirements by the chunk but also it's children runtime requirements.
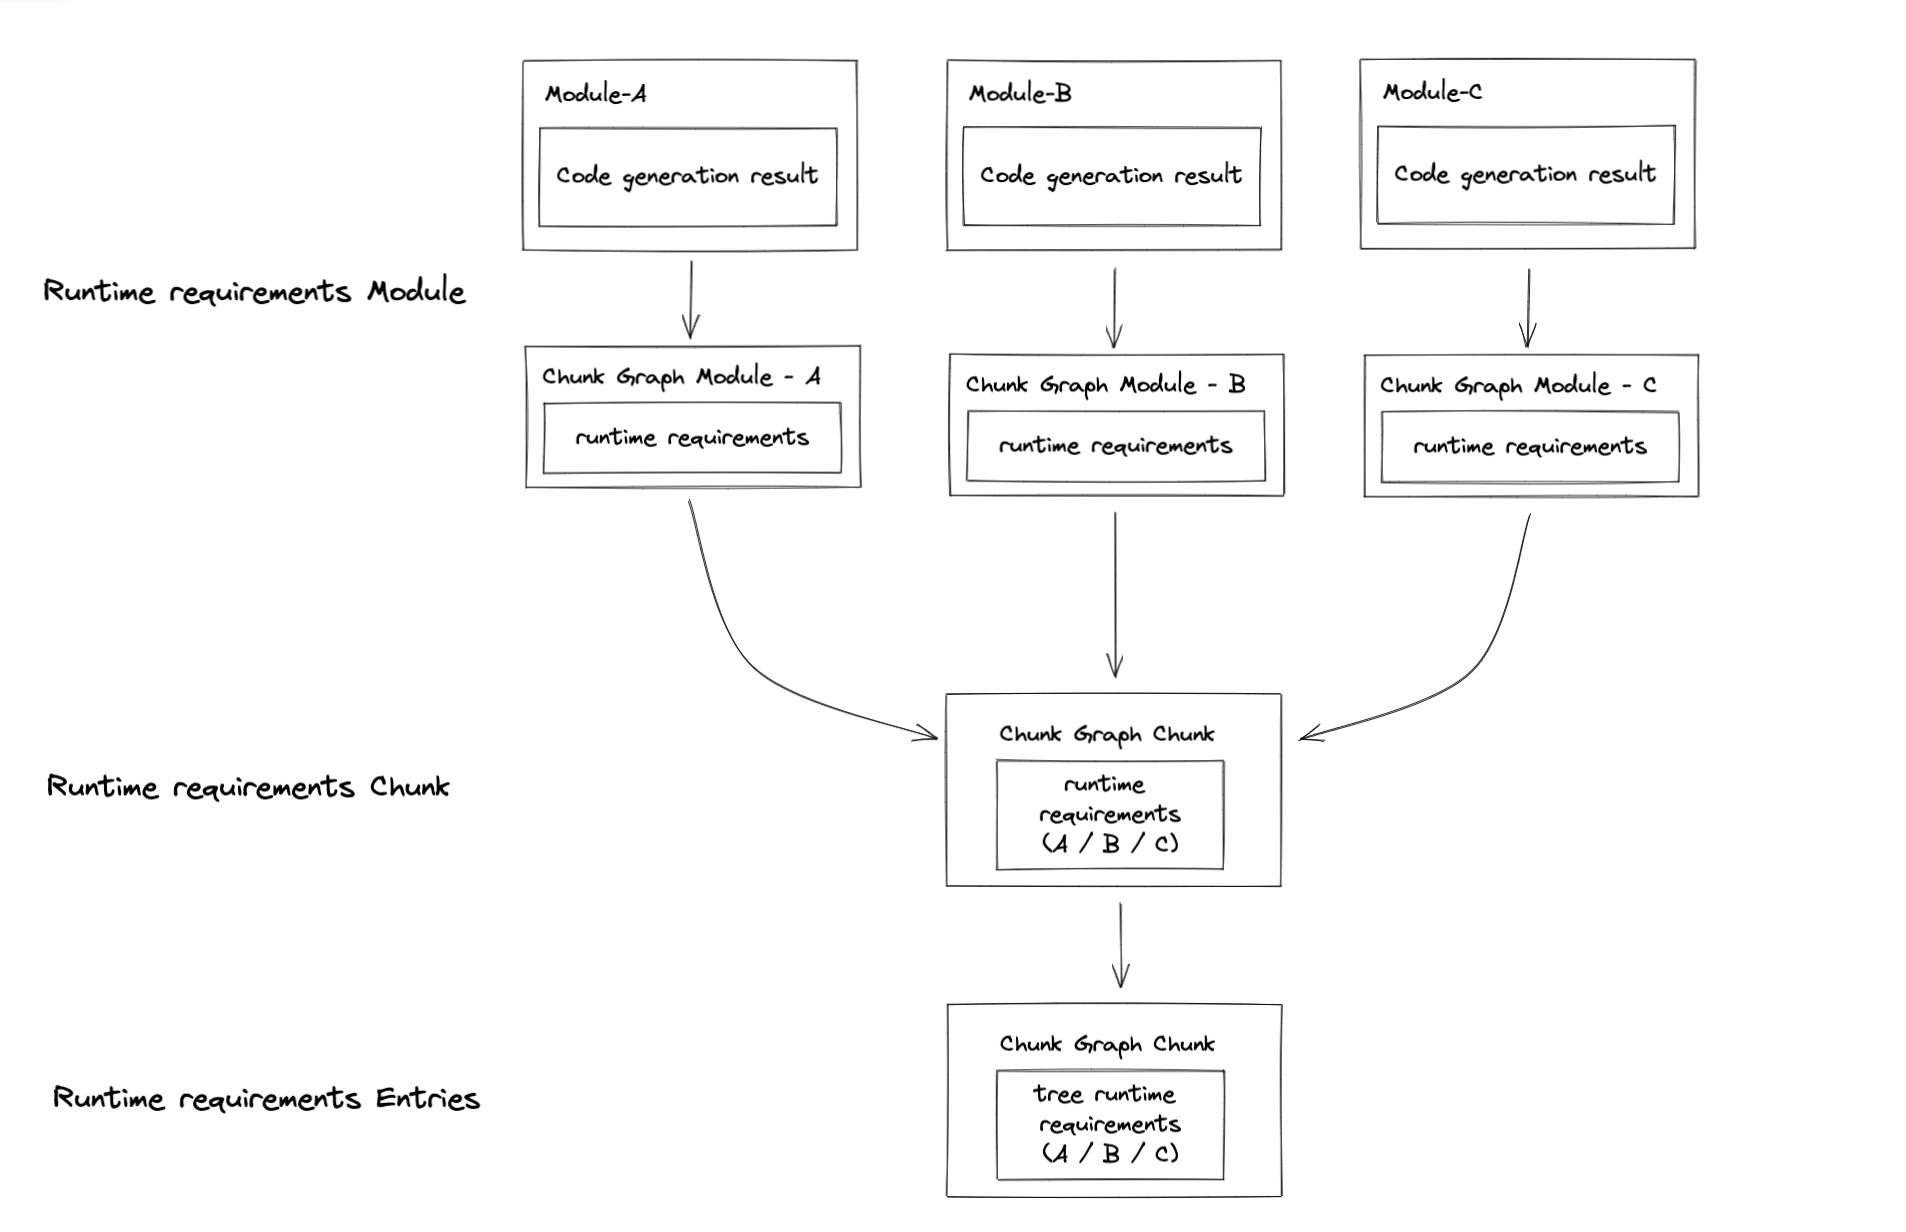
The referenced source code you can be found it here and these steps are basically done in processRuntimeRequirements. This let me recall the linking procedure of a rollup-like bundler. Anyway, after this procedure, we can finally generate runtime modules. Actually, I lied here, huge thanks to the hook system of Webpack, the creation of runtime modules is done in this method via calls to runtimeRequirementInTree[source]. No doubt, this is all done in the seal step. After that, webpack will process each chunk and create a few code generation jobs, and finally, emit assets.
Hot module replacement
Changes made via hot module replacement is mostly come from HotModuleReplacementPlugin.
Given the code below:
if (module.hot) {
  module.hot.accept(...)
}
Webpack will replace expressions like module.hot and module.hot.accept, etc with ConstDependency as the presentationalDependency as I previously talked about. [source]
With the help of a simple expression replacement is not enough, the plugin also introduce additional runtime modules for each entries. [source]
The plugin is quite complicated, and you should definitely checkout what it actually does, but for things related to dependency, it's enough.
How dependencies affect production optimizations
Constant folding
The logic is defined in ConstPlugin : [source]
Constant folding is a technique that used as an optimization for optimization. For example:
Source
if (process.env.NODE_ENV === "development") {
   ...
} else {
   ...
}
Generated
if (true) {
  ...
}
With mode set to "development", webpack will "fold" the expression process.env.NODE_ENV === "development" into an expression of "true" as you can see for the code generation result.
In the make procedure of webpack, Webpack internally uses an JavaScriptParser for JavaScript parsing. If an ifStatement is encountered, Webpack creates a corresponding ConstDependency. Essentially, for the ifStatement, the ConstDependency looks like this :
ConstDependency {
  expression: "true",
  range: [start, end] // range to replace
}
It's almost the same with else branch, if there is no side effects(refer to source code for more detail), Webpack will create another ConstDependency with expression set to "", which in the end removes the else branch.
In the seal procedure of Webpack, the record of the dependency will be applied to the original source code and generate the final result as you may have already seen above.
Tree shaking & DCE
Tree-shaking is a technique of a bundle-wise DCE(dead code elimination). In the following content, I will use tree-shaking as a wording for bundle-wise and DCE for module-wise code elimination. (I know it's not quite appropriate, but you get the point)
Here's an example:
// webpack configuration
module.exports = {
  optimization: {
    usedExports: true
  }
}
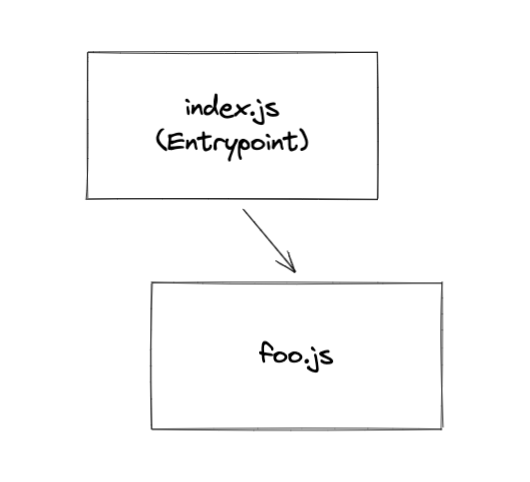
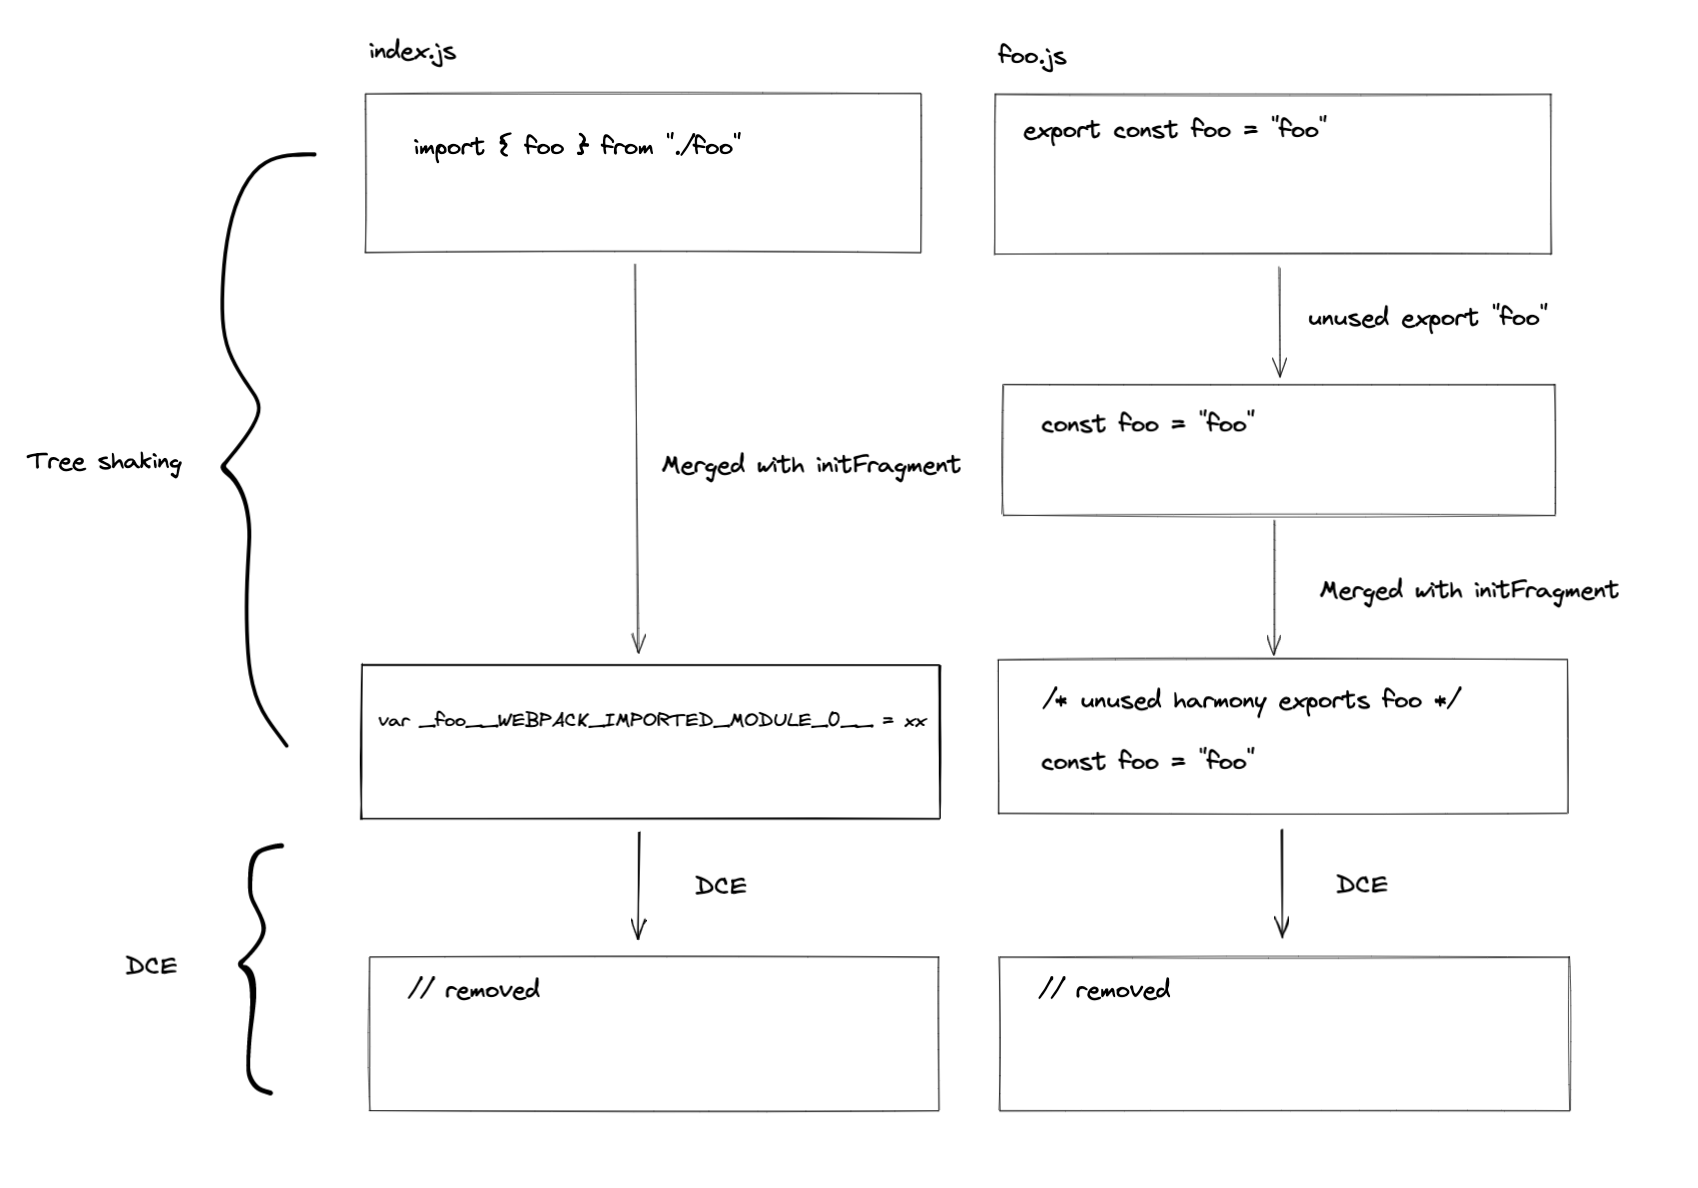
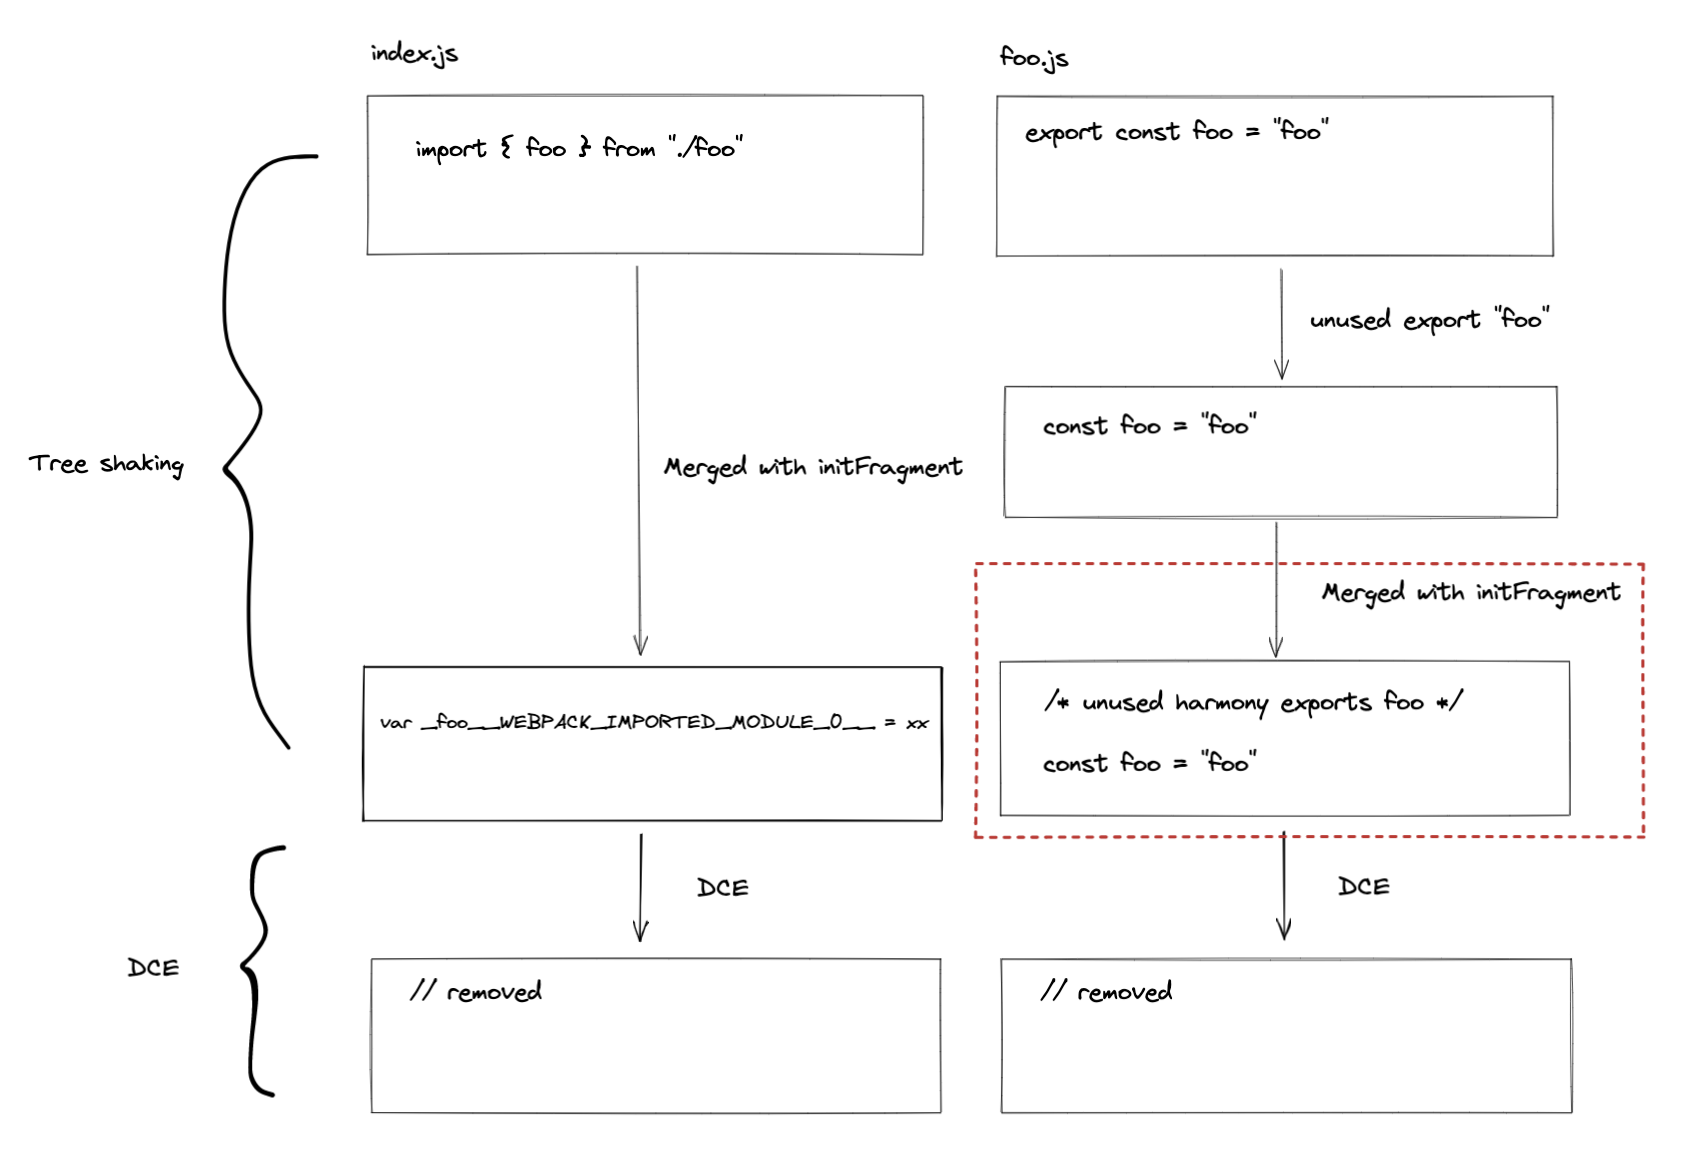
As you can see from the red square, the initFragment is generated based on the usage of the exported symbol in the HarmonyExportSpecifierDependency [source]
If foo is used in the graph, then the generated result will be this:
/* harmony export */ __webpack_require__.d(__webpack_exports__, {
/* harmony export */   "foo": function() { return /* binding */ foo; }
/* harmony export */ });
const foo = "foo";
In the example above, the foo is not used, so it will be excluded in the code generation of the template of HarmonyExportSpecifierDependency and it will be dead-code-eliminated in later steps. For terser plugin, it eliminates all unreachable code in processAssets [source].
Things related to Persistent cache
TODO
Wrap it up!
Let's wrap everything up in a simple example! Isn't it exciting?
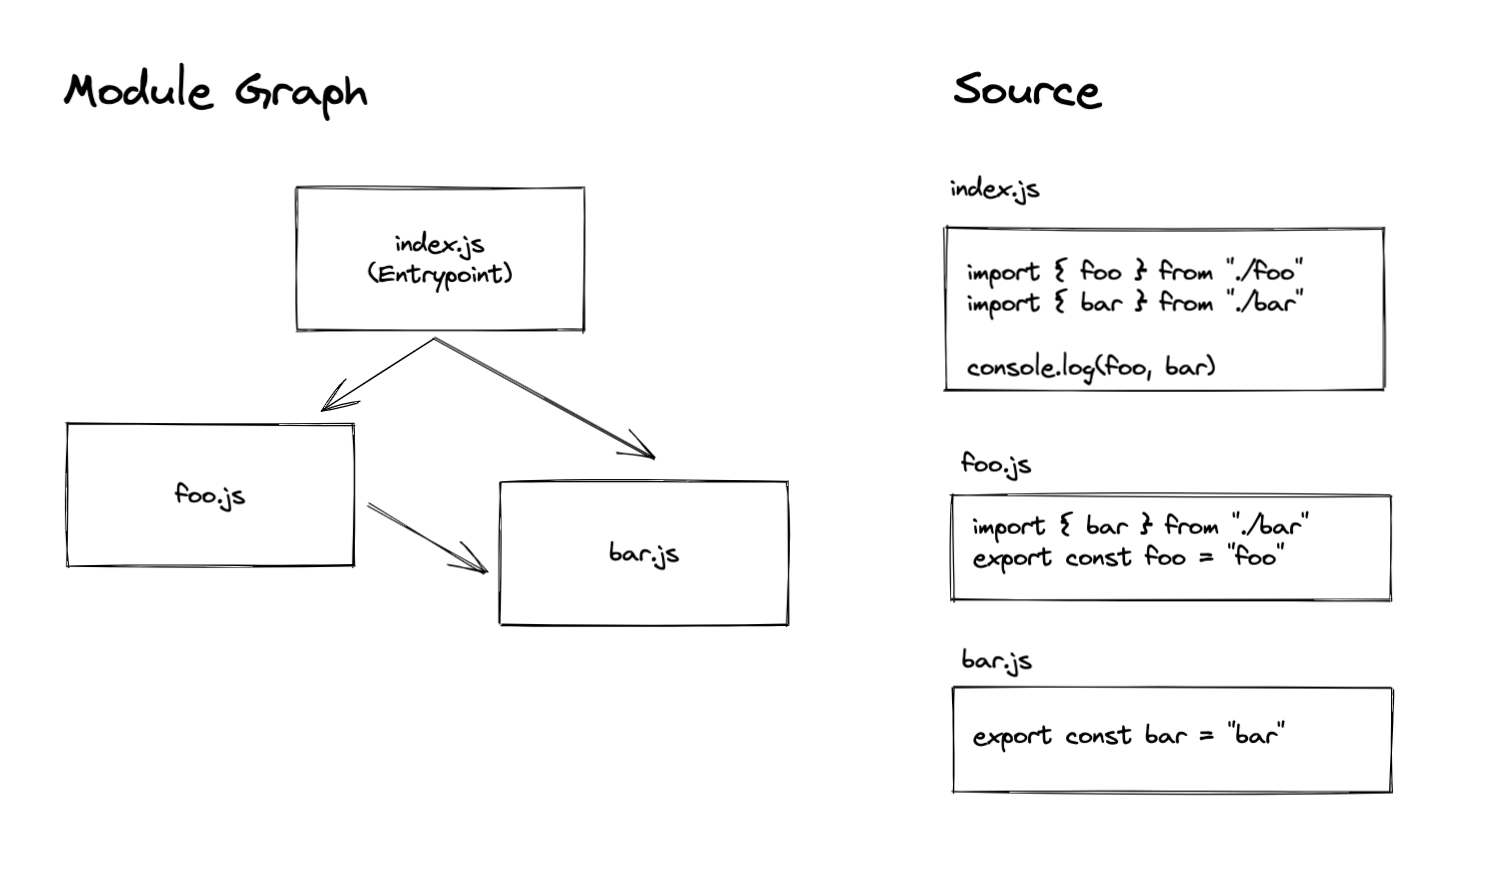
Given a module graph that contains three modules, the entry point of this bundle is index.js. To not make this example too complicated, we use normal import statements to reference each module (i.e: only one chunk that bundles everything will be created).
Make
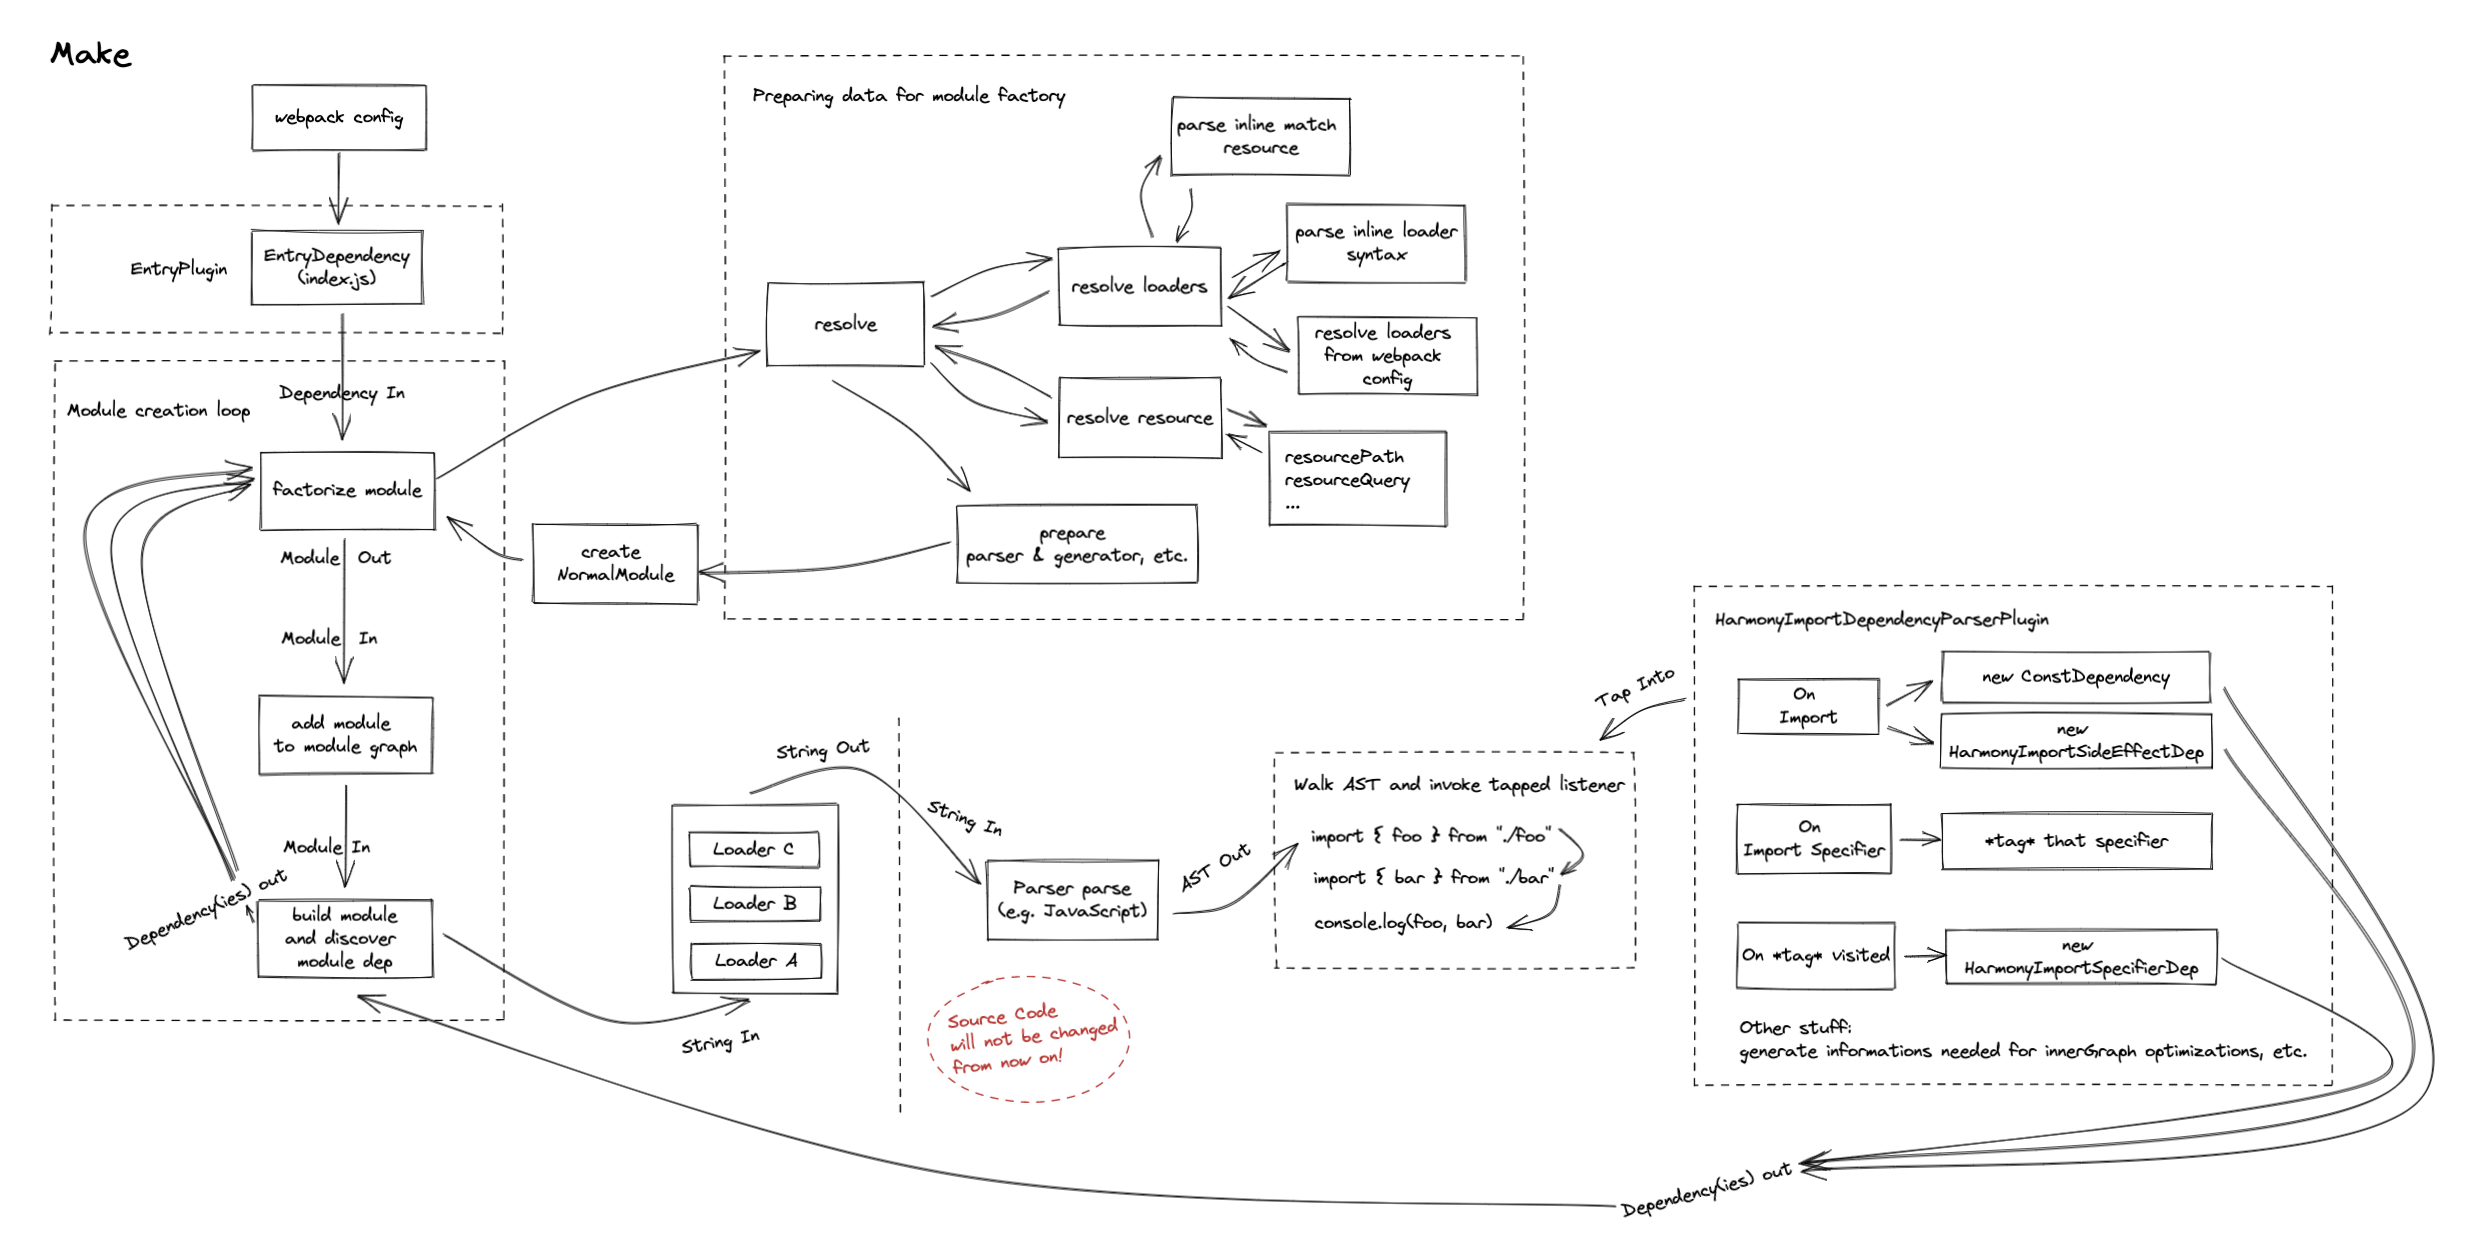
Dependencies after make
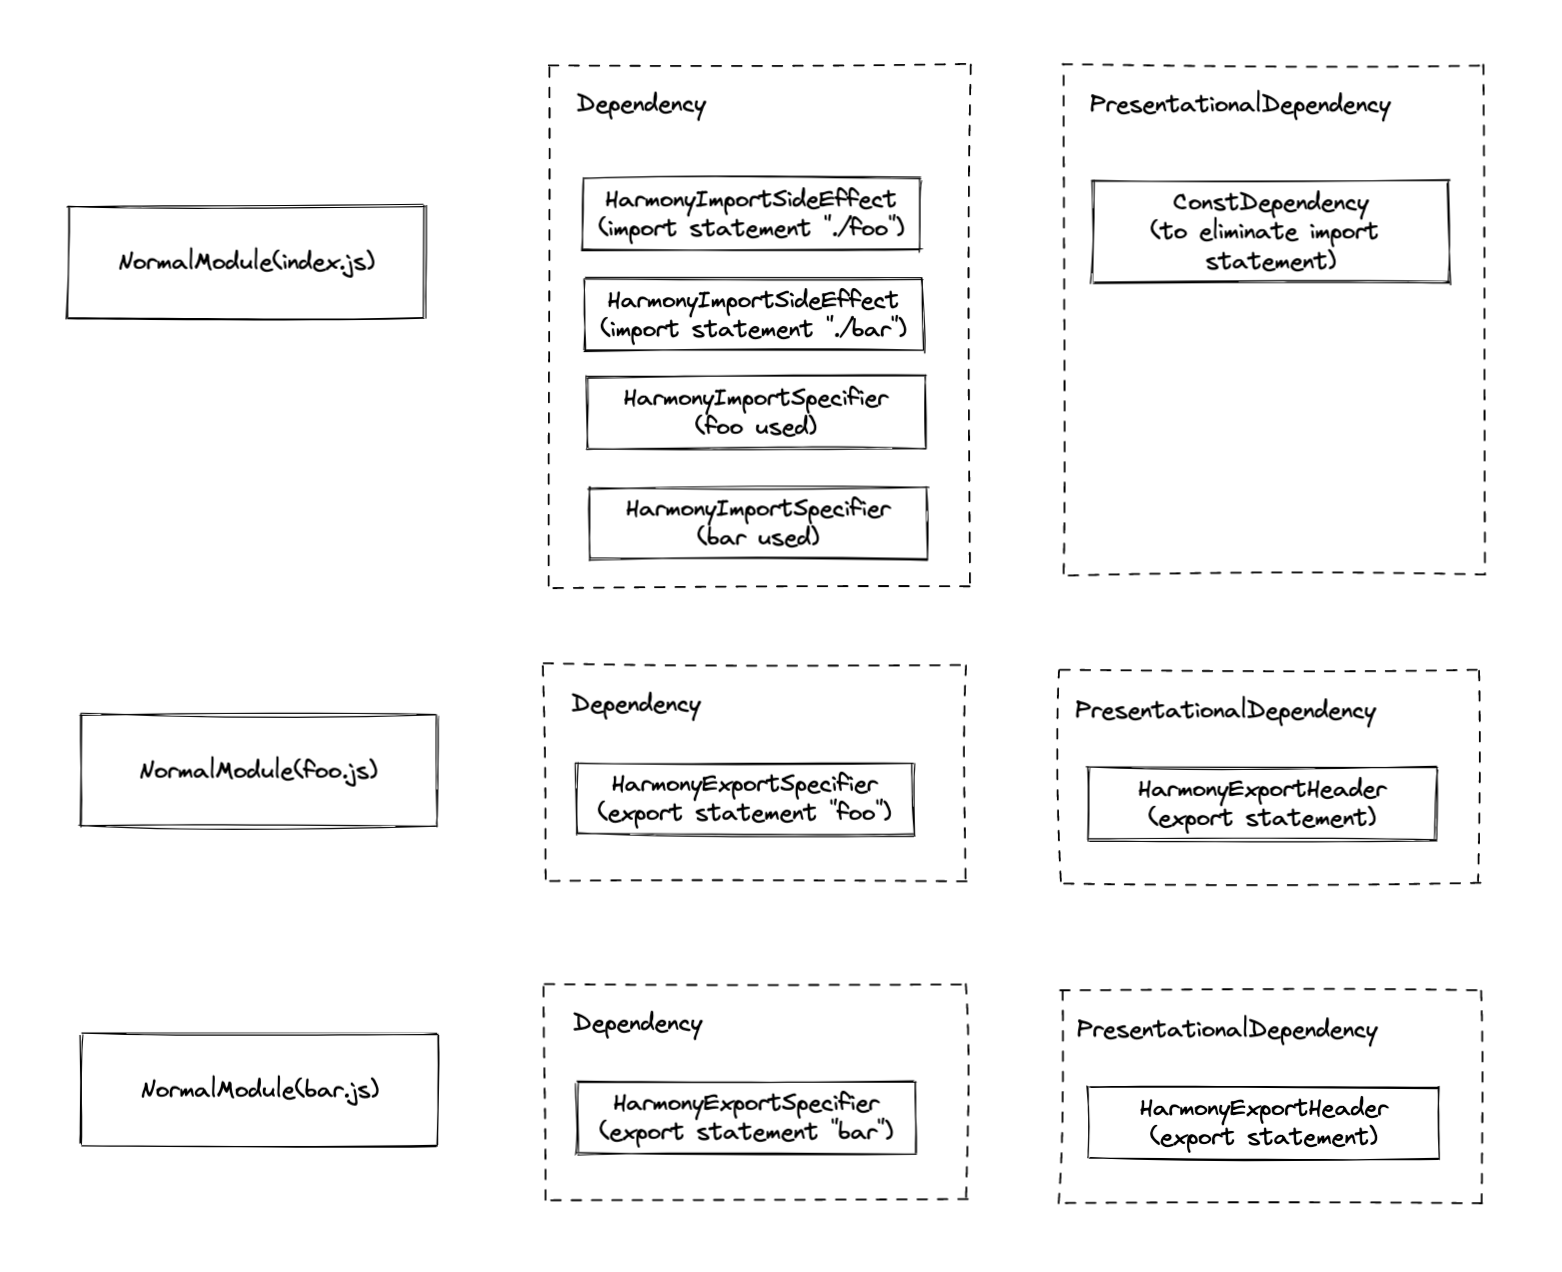
seal
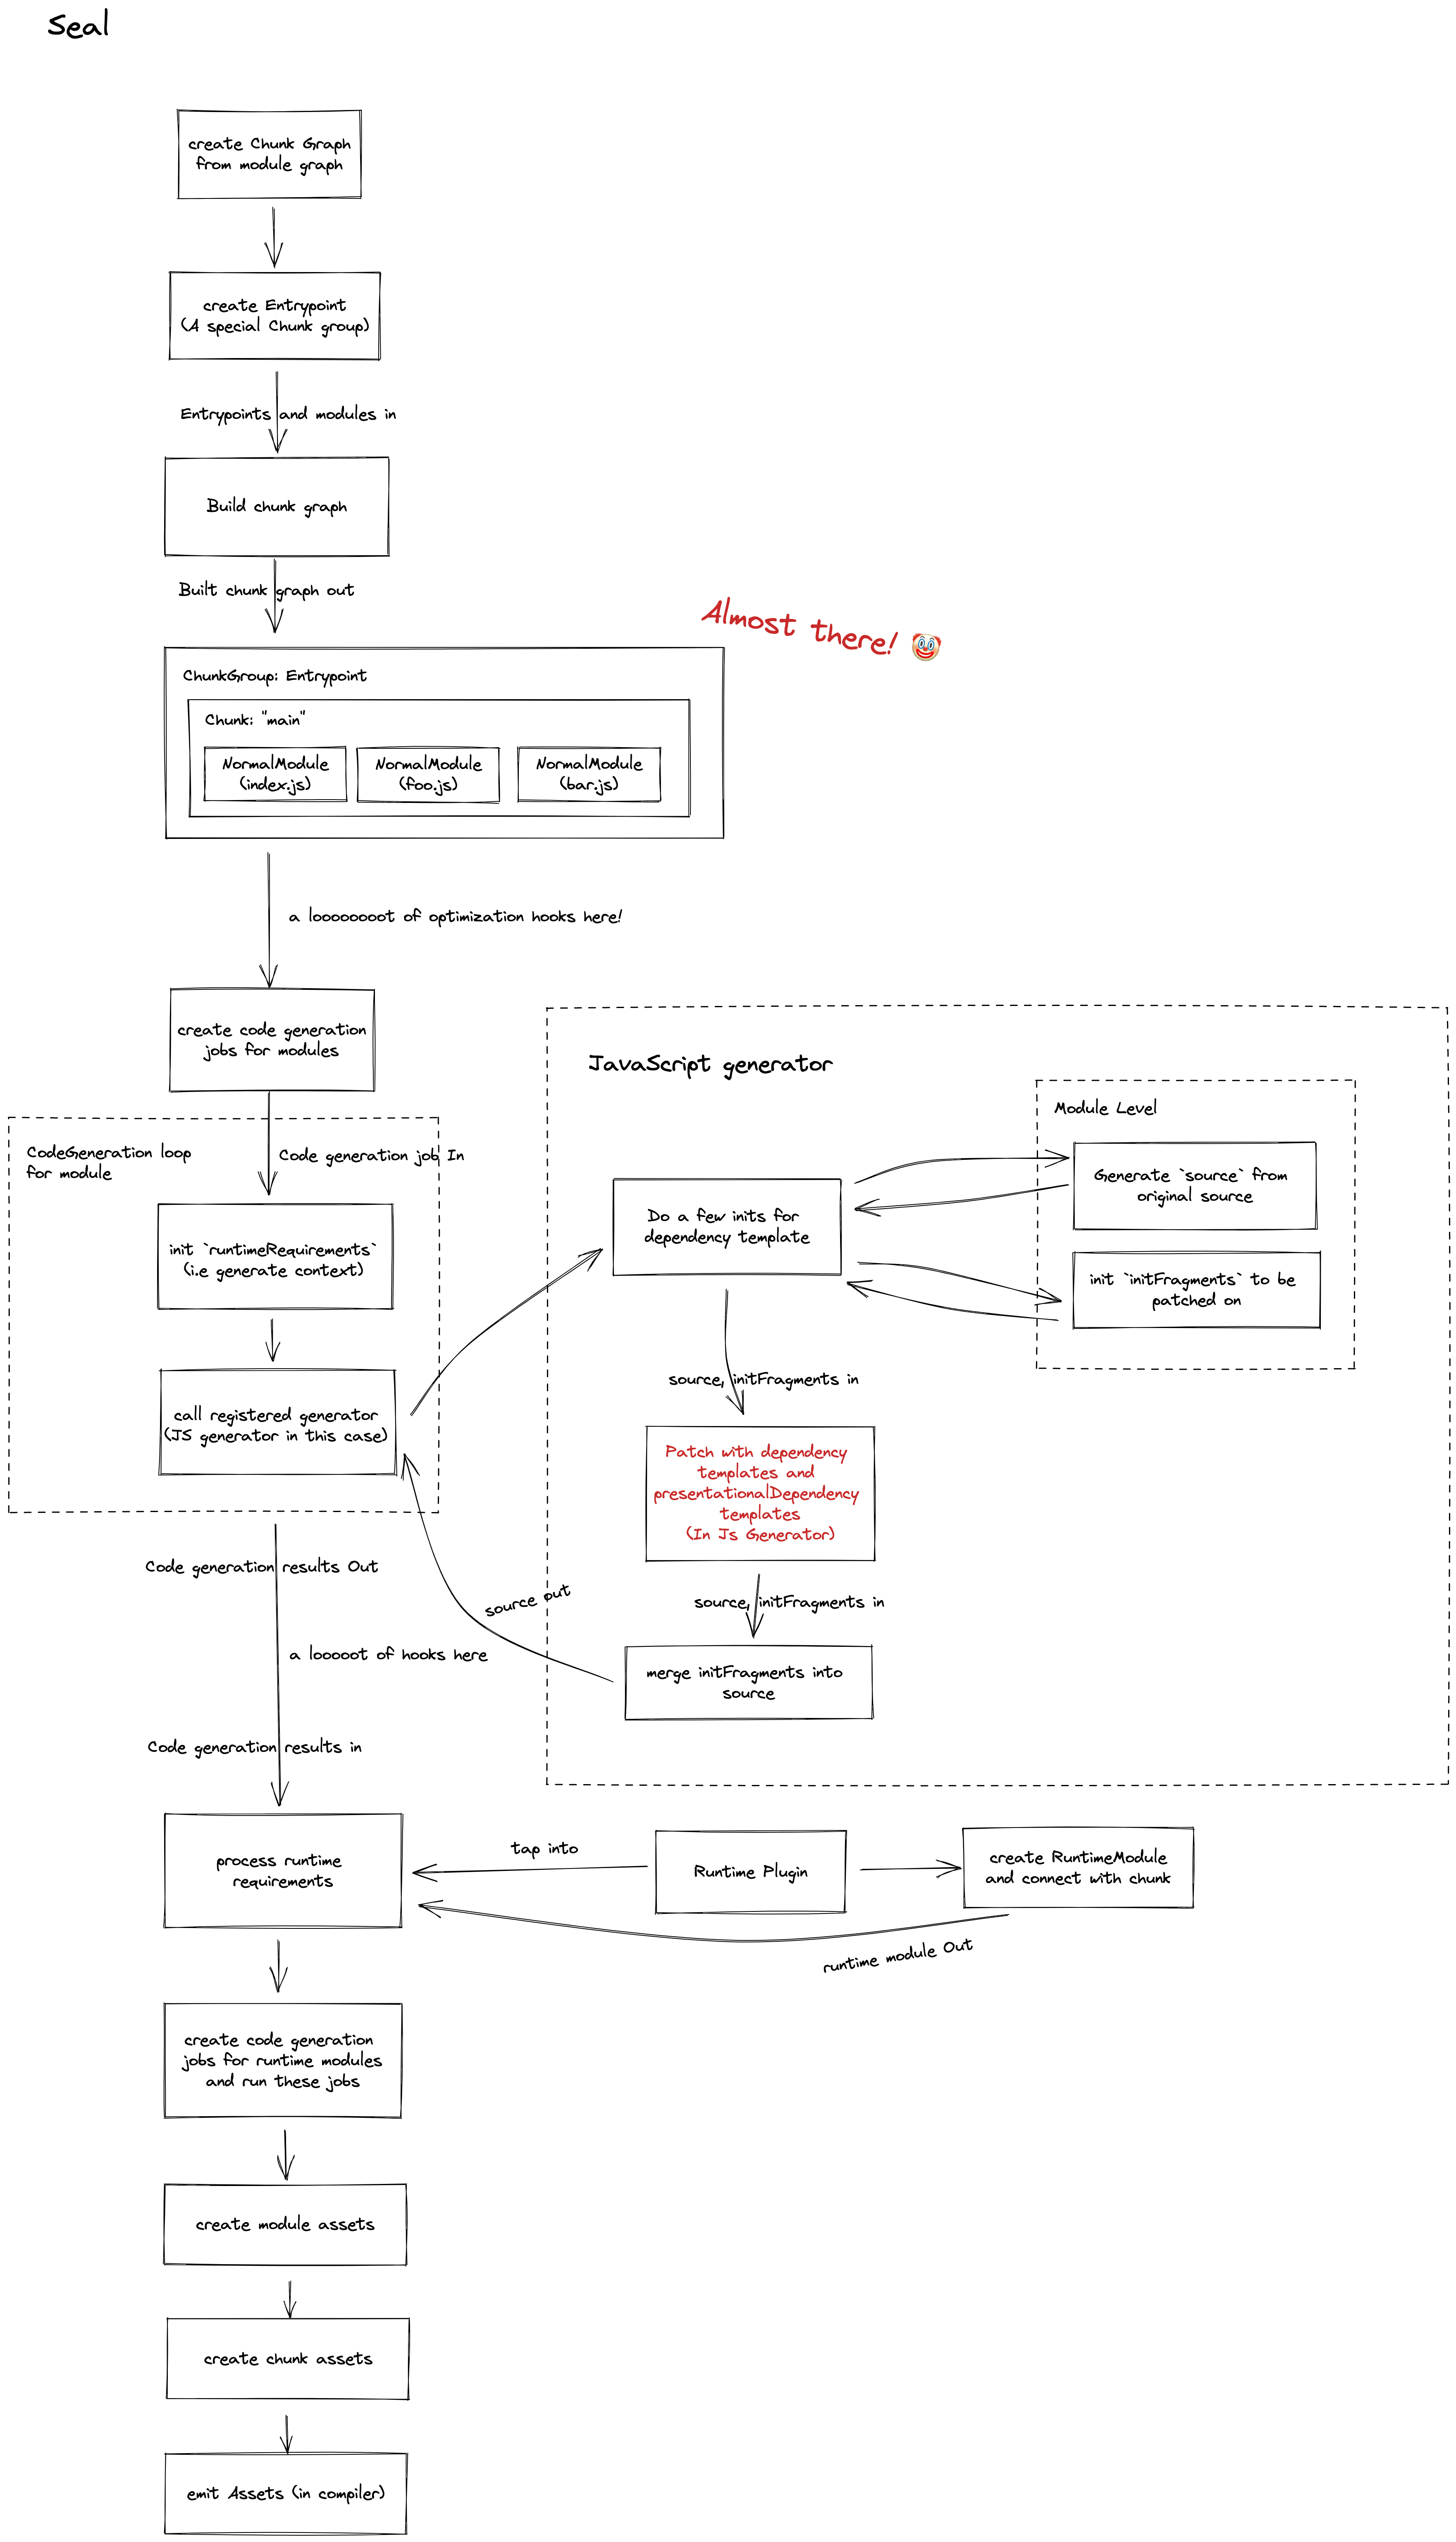
References
TODO
Meetings
Tuesday meeting
- Go through the iteration plan
Thursday meeting
- Go through any topics that need to be discussed
Releases
-
0.1.0->0.1.1is a patch release. -
0.1.0->0.2.0is a minor release. -
0.1.0->1.0.0is a major release.
See details at semver.org
Release Cycle
-
Patch releases are released Tuesday per week.
-
Minor releases are released as needed.
-
Major releases are released as needed.
See milestones to follow our release plan.
Misc
"need documentation" label
This is used for reminding ourselves to update the Rspack website for a new feature.
When a PR is merged with the "need documentation" label, rspack-bot will create a corresponding PR in the rspack-website repo.
Appendix A: Learning resources
Rust
Webpack
Appendix Z: Fun stuff
Motto
Question webpack, understand webpack, become webpack
Team building game
Despite being located across different cities, the rspack team has found an enjoyable way to bond when we meet in person. We play a team building game where we ask each other webpack questions. @hardfist hasn't lost a single game yet.